
Plan your budget with confidence
Model scenarios, compare allocations, and find the spend mix most likely to hit your revenue goals.
Planner helps you decide where your next dollar should go before you spend it. Using your promoted Marketing Mix Model (the MMM your team has approved as the source of truth for planning), you can model different media and commercial scenarios, compare them side by side, and find the allocation most likely to hit your budget or revenue goals.
What you can do with Planner
Planner gives you everything you need to move from "what if" to a plan you can act on:
- Build plans with one or more scenarios so you can test different strategies against the same model and pick the strongest one.
- Optimize a fixed budget or work toward a revenue goal. Tell Planner how much you have to spend and it recommends the best split, or tell it the revenue you need and it works out the spend required to get there.
- Set planning and reference periods. The planning period is the time window you are planning for. The reference period (a past time window Planner uses as a baseline for spend and performance) anchors your forecast in real historical results.
- Configure channel constraints and non-media drivers. Set minimum and maximum spend limits per channel to reflect contracts, commitments, or business rules, and account for non-media drivers (factors outside advertising that influence sales, such as pricing, promotions, or seasonality).
- Apply custom monthly pacing (how your budget is distributed across months) to match seasonal peaks, launches, or cash flow needs.
- Compare current and recommended allocations to see exactly where Planner suggests shifting spend and why.
- Review forecast, efficiency, saturation, and pacing results to understand the expected revenue impact, return on spend, and the point at which each channel stops delivering meaningful additional returns (saturation).
- Promote a scenario to Decisions so your chosen plan flows directly into execution.
Find your way around the Planner workspace
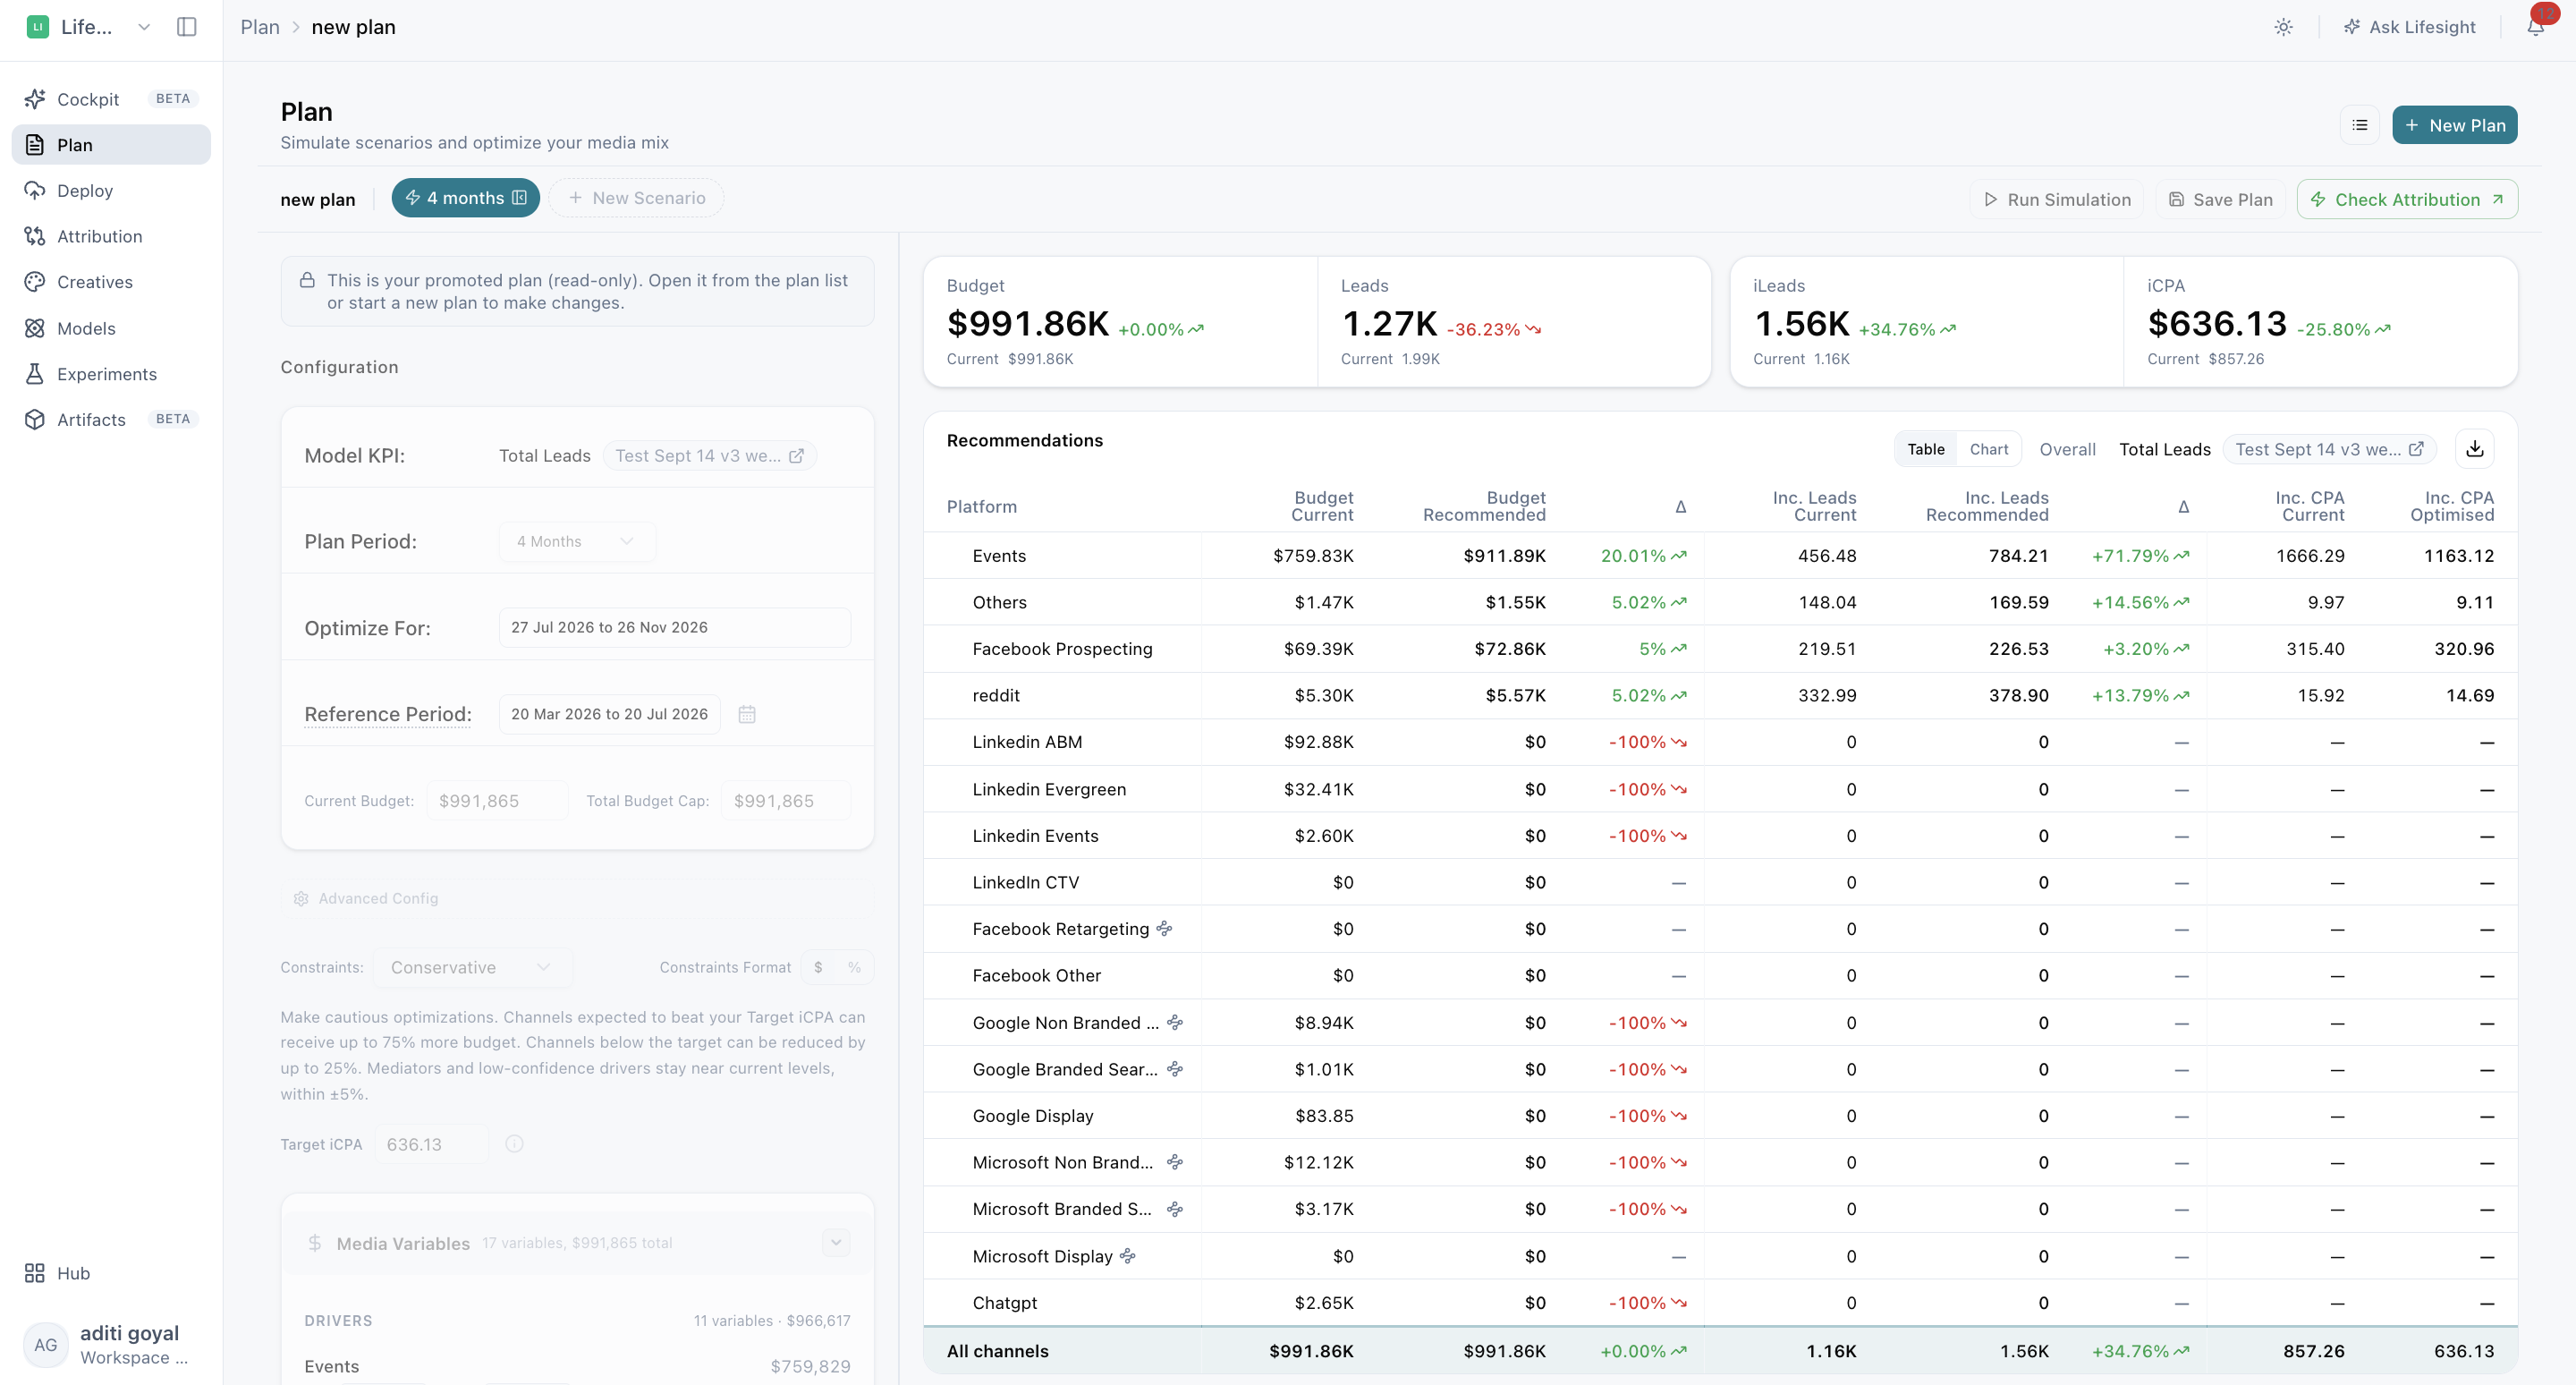
The Planner workspace is split into two panels so you can set up your assumptions on one side and see the impact on the other.
Left panel: set up your scenario. This is where you define everything Planner needs to build a recommendation:
- Scenario configuration, including whether you are optimizing a budget or targeting revenue
- Planning and reference periods
- Budgets
- Channel constraints
- Media variables (the paid channels and tactics in your model)
- Control variables (the non-media factors, such as pricing or promotions, that the model accounts for)
After making any changes, run the simulation to refresh your results.
Right panel: see the outcome. Once the simulation runs, this panel shows you what your plan is likely to deliver:
- $Headline KPIs summarizing expected revenue, spend, and efficiency
- Recommendations highlighting where to increase or reduce spend
- Forecast charts and tables showing projected performance over the planning period
- The budget worksheet, a channel-by-channel view of current versus recommended spend
- Saturation curves showing where each channel starts to deliver diminishing returns
- Pacing breakdowns showing how spend is distributed over time
- Dimension analysis for exploring results by channel, region, or other breakdowns in your model.
[VIDEO PLACEHOLDER: Navigating Planner configuration and results]
Test ideas side by side with scenarios and plans
A plan can hold multiple scenarios, all built on the same model. This lets you compare strategies fairly, for example a conservative budget versus an aggressive growth push, or a plan with and without a specific channel.
To create a scenario, start from scratch or copy the active scenario and adjust the assumptions you want to test. Run each scenario so its results are ready for comparison.
Once all scenarios have finished running, save the plan. You can then use Plan List to browse, load, archive, restore, delete, promote, or demote plans, depending on your permissions.
Put your chosen plan to work by promoting a scenario
When you have found the scenario you want to move forward with, promote it. Promoting a scenario makes it available in Decisions and to downstream deployment workflows, so your plan can go straight from modeling to execution.
The promoted plan becomes the default view in Planner and is read-only there, which keeps your approved plan protected from accidental changes. If you need to make edits, open the plan from Plan List to get an editable view.
Your Planner results reflect the promoted model, reference period, constraints, and assumptions selected for each scenario. If any of these change, rerun your scenarios to keep your forecasts and recommendations accurate.
Frequently asked questions
What is Planner in Lifesight?
Planner is the budget planning and optimization capability in Lifesight 4.0. It uses your promoted Marketing Mix Model (MMM) to forecast how different media and commercial scenarios will perform, so you can compare options and choose the budget allocation most likely to hit your revenue or spend goals before you commit budget.
How does Planner recommend a budget allocation?
Planner runs a simulation using your promoted Marketing Mix Model, your selected planning and reference periods, channel constraints, and non-media drivers. It then compares your current allocation against a recommended allocation and shows where to increase or reduce spend by channel.
Can Planner optimize for a revenue target instead of a fixed budget?
Yes. Planner supports two optimization goals. You can optimize a fixed budget, where Planner recommends the best split of the spend you have, or work toward a revenue goal, where Planner estimates the spend required to reach your target.
What is a promoted model in Planner?
A promoted model is the Marketing Mix Model your team has approved as the source of truth for planning. Planner uses the promoted model for every scenario in a plan, so all scenarios are compared on the same basis.
What is the difference between the planning period and the reference period?
The planning period is the future time window you are building a budget plan for. The reference period is a past time window that Planner uses as a baseline for spend and performance, which anchors your forecast in real historical results.
Can I set minimum or maximum spend limits for a channel?
Yes. Planner lets you configure channel constraints, which are minimum and maximum spend limits for each channel. Use them to reflect media contracts, spend commitments, or business rules so recommendations stay realistic for your team.
What are non-media drivers and control variables in Planner?
Non-media drivers, set up in Planner as control variables, are factors outside advertising that influence sales, such as pricing, promotions, or seasonality. Including them in a scenario helps Planner separate the impact of media spend from other business factors.
Can I control how budget is spread across months?
Yes. Planner supports custom monthly pacing, which sets how your budget is distributed across each month of the planning period. This helps you plan around seasonal peaks, product launches, or cash flow needs.
What results does Planner show after a simulation?
After you run a simulation, Planner shows headline KPIs for expected revenue, spend, and efficiency, along with spend recommendations, forecast charts and tables, a budget worksheet comparing current and recommended spend by channel, saturation curves, pacing breakdowns, and dimension analysis by channel, region, or other breakdowns in your model.
What do saturation curves show in Planner?
Saturation curves show the point at which additional spend in a channel starts to deliver diminishing returns. They help you spot channels where you are overspending and channels that still have room to scale efficiently.
How do I compare multiple budget scenarios in Planner?
Create a plan and add more than one scenario to it. You can build a scenario from scratch or copy the active scenario and change the assumptions you want to test, such as budget level or channel mix. Run each scenario, then compare the results side by side. All scenarios in a plan use the same model, so the comparison is consistent.
How do I save a plan in Planner?
Save the plan after all of its scenarios have finished running. Saved plans appear in Plan List, where you can browse, load, archive, restore, delete, promote, or demote plans, depending on your permissions.
What happens when I promote a scenario?
Promoting a scenario makes it available in Decisions and to downstream deployment workflows, so your chosen plan moves from modeling into execution. The promoted plan becomes the default view in Planner.
Why can't I edit my promoted plan?
The promoted plan is read-only in the default Planner view to protect your approved plan from accidental changes. To make edits, open the plan from Plan List, which gives you an editable view.
When should I rerun my Planner scenarios?
Rerun your scenarios whenever the promoted model, reference period, constraints, or other assumptions change. Planner results depend on these inputs, so rerunning keeps your forecasts and recommendations accurate.
Related Articles
Updated about 3 hours ago