
Setting up your Marketing Mix Model
Your guide to configure data, select variables, and launching your marketing mix model
Setting up a marketing mix model is mostly about getting the inputs right. When your data, variables, and settings are set up correctly, everything downstream, from contribution results to budget planning, holds up.
This guide walks you through what your data needs to look like, how to choose the variables your model learns from, and what happens once you submit your model.
Get your data ready for a successful model build
To build a reliable model, your data needs to be prepared correctly. You can bring data into Lifesight in two ways.
Use a Data Model
To build a model with data already in Lifesight, select an existing Data Model from your workspace. A Data Model brings together the fields you've configured from your connected sources and makes them available for variable mapping when you create your model.
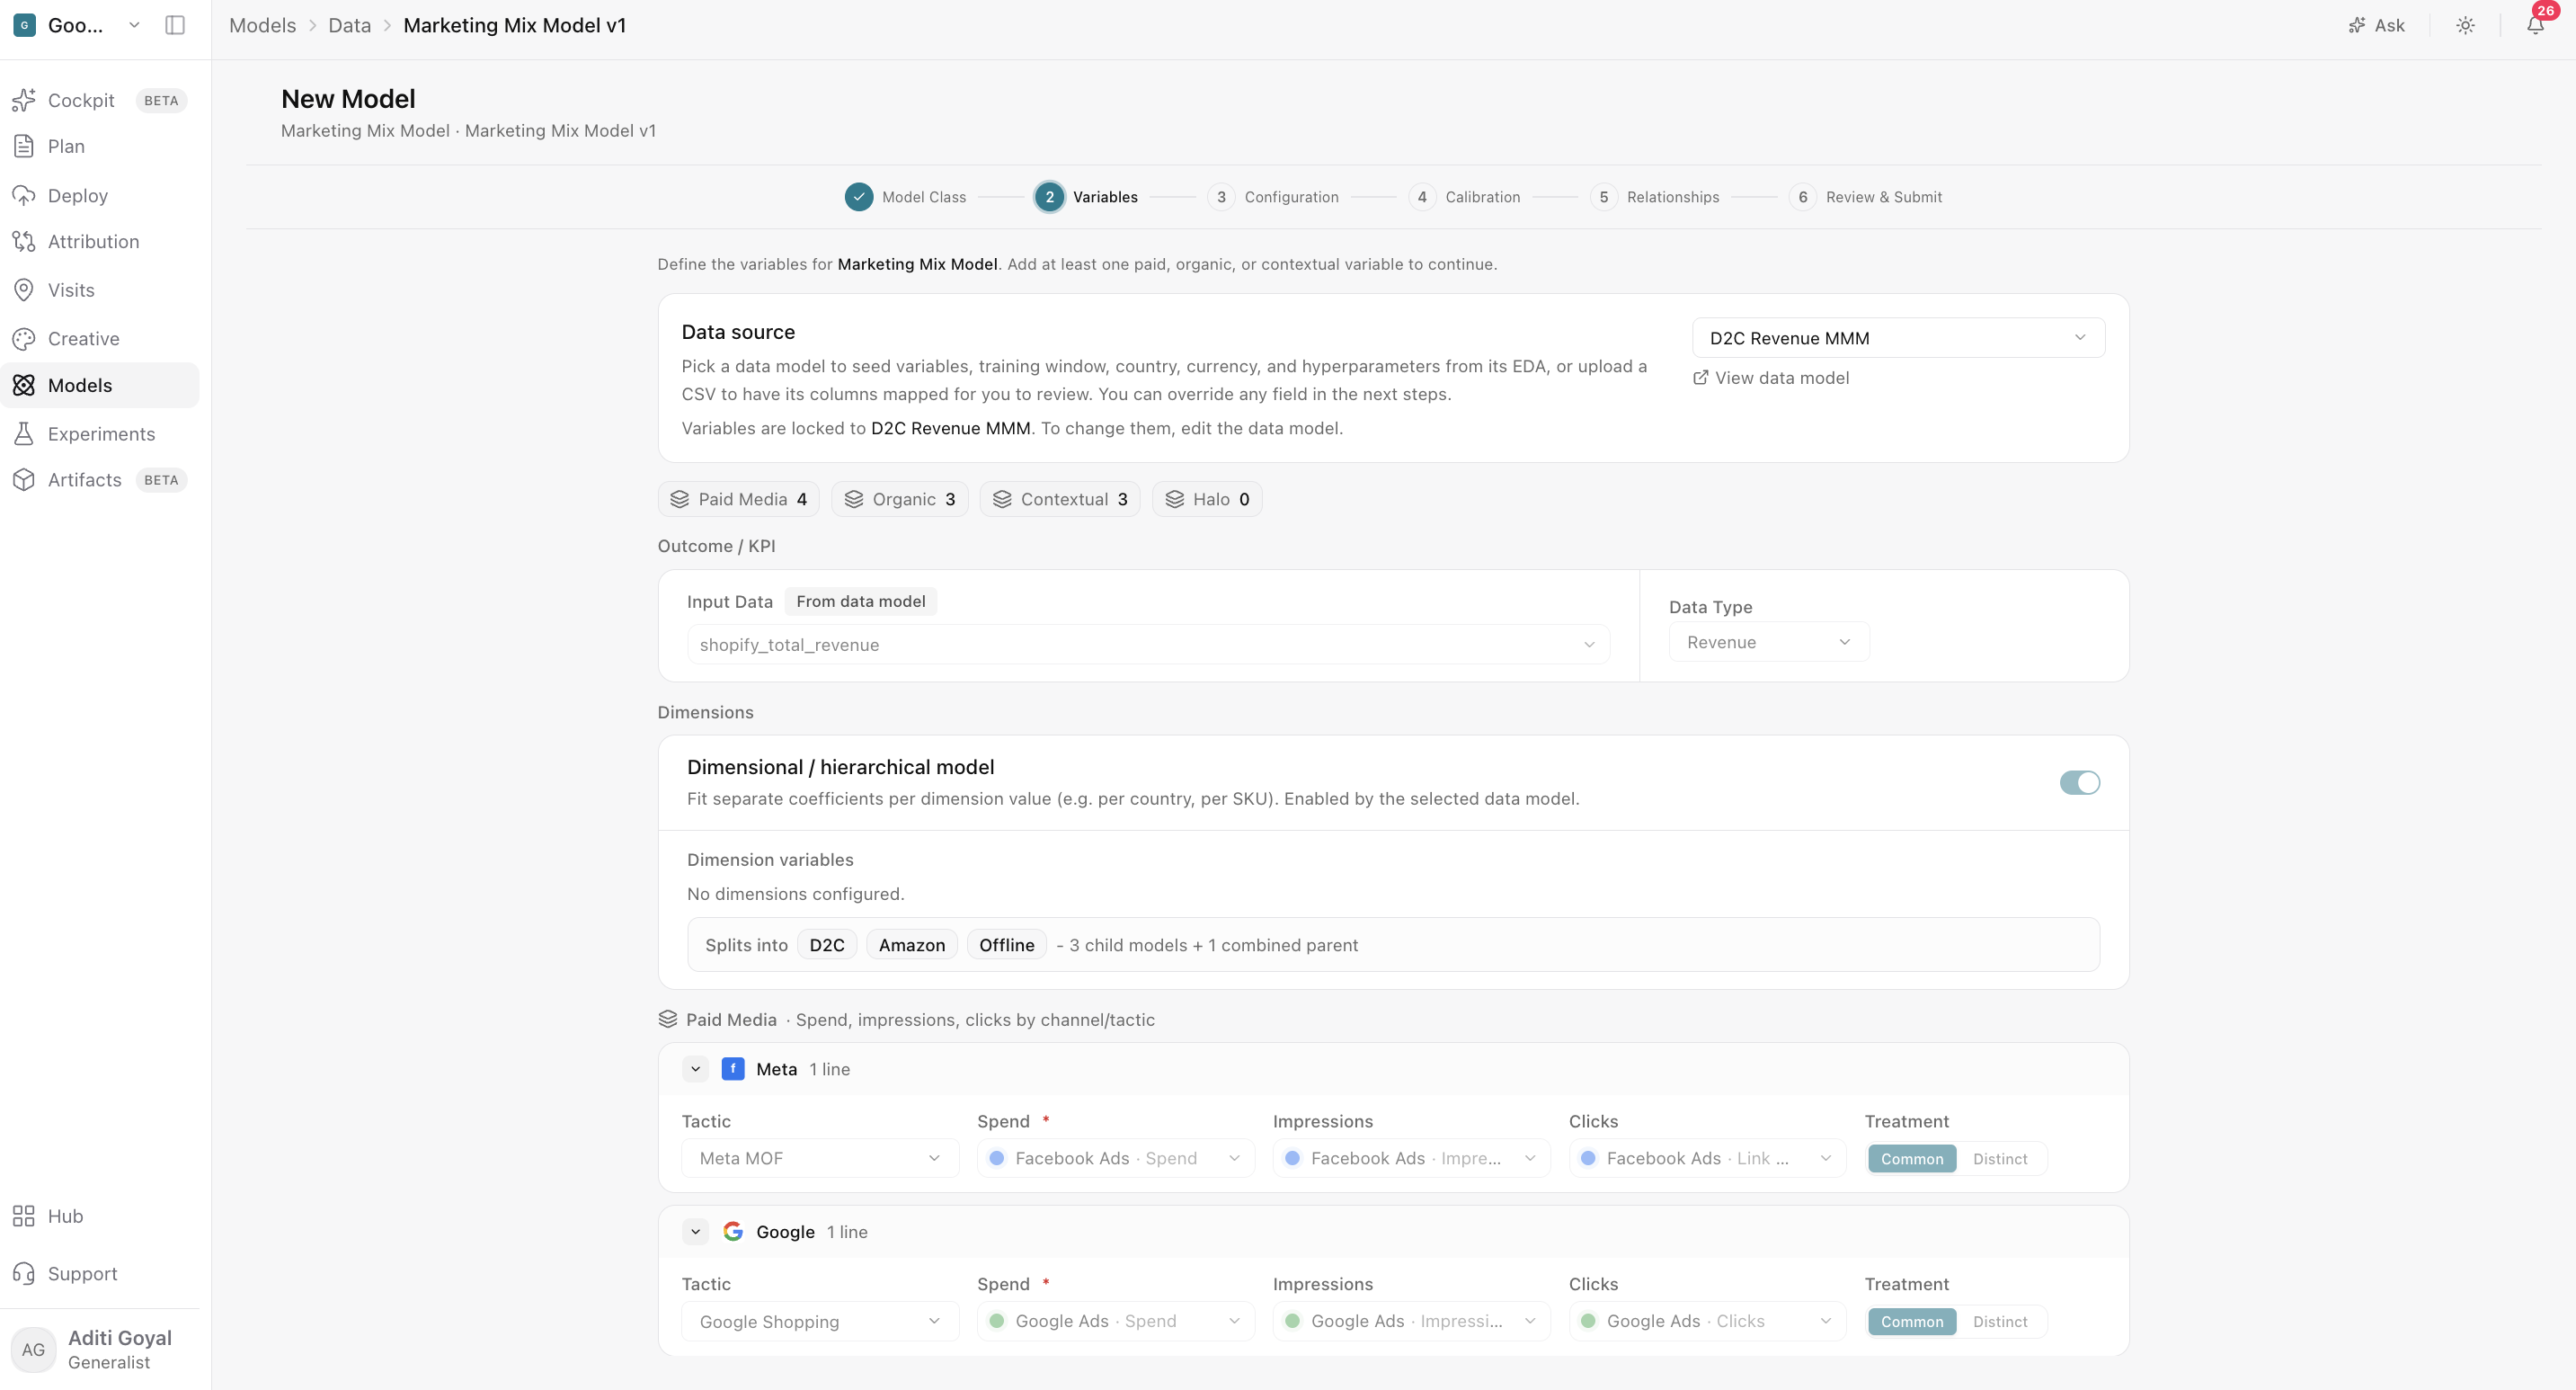
Use a CSV file
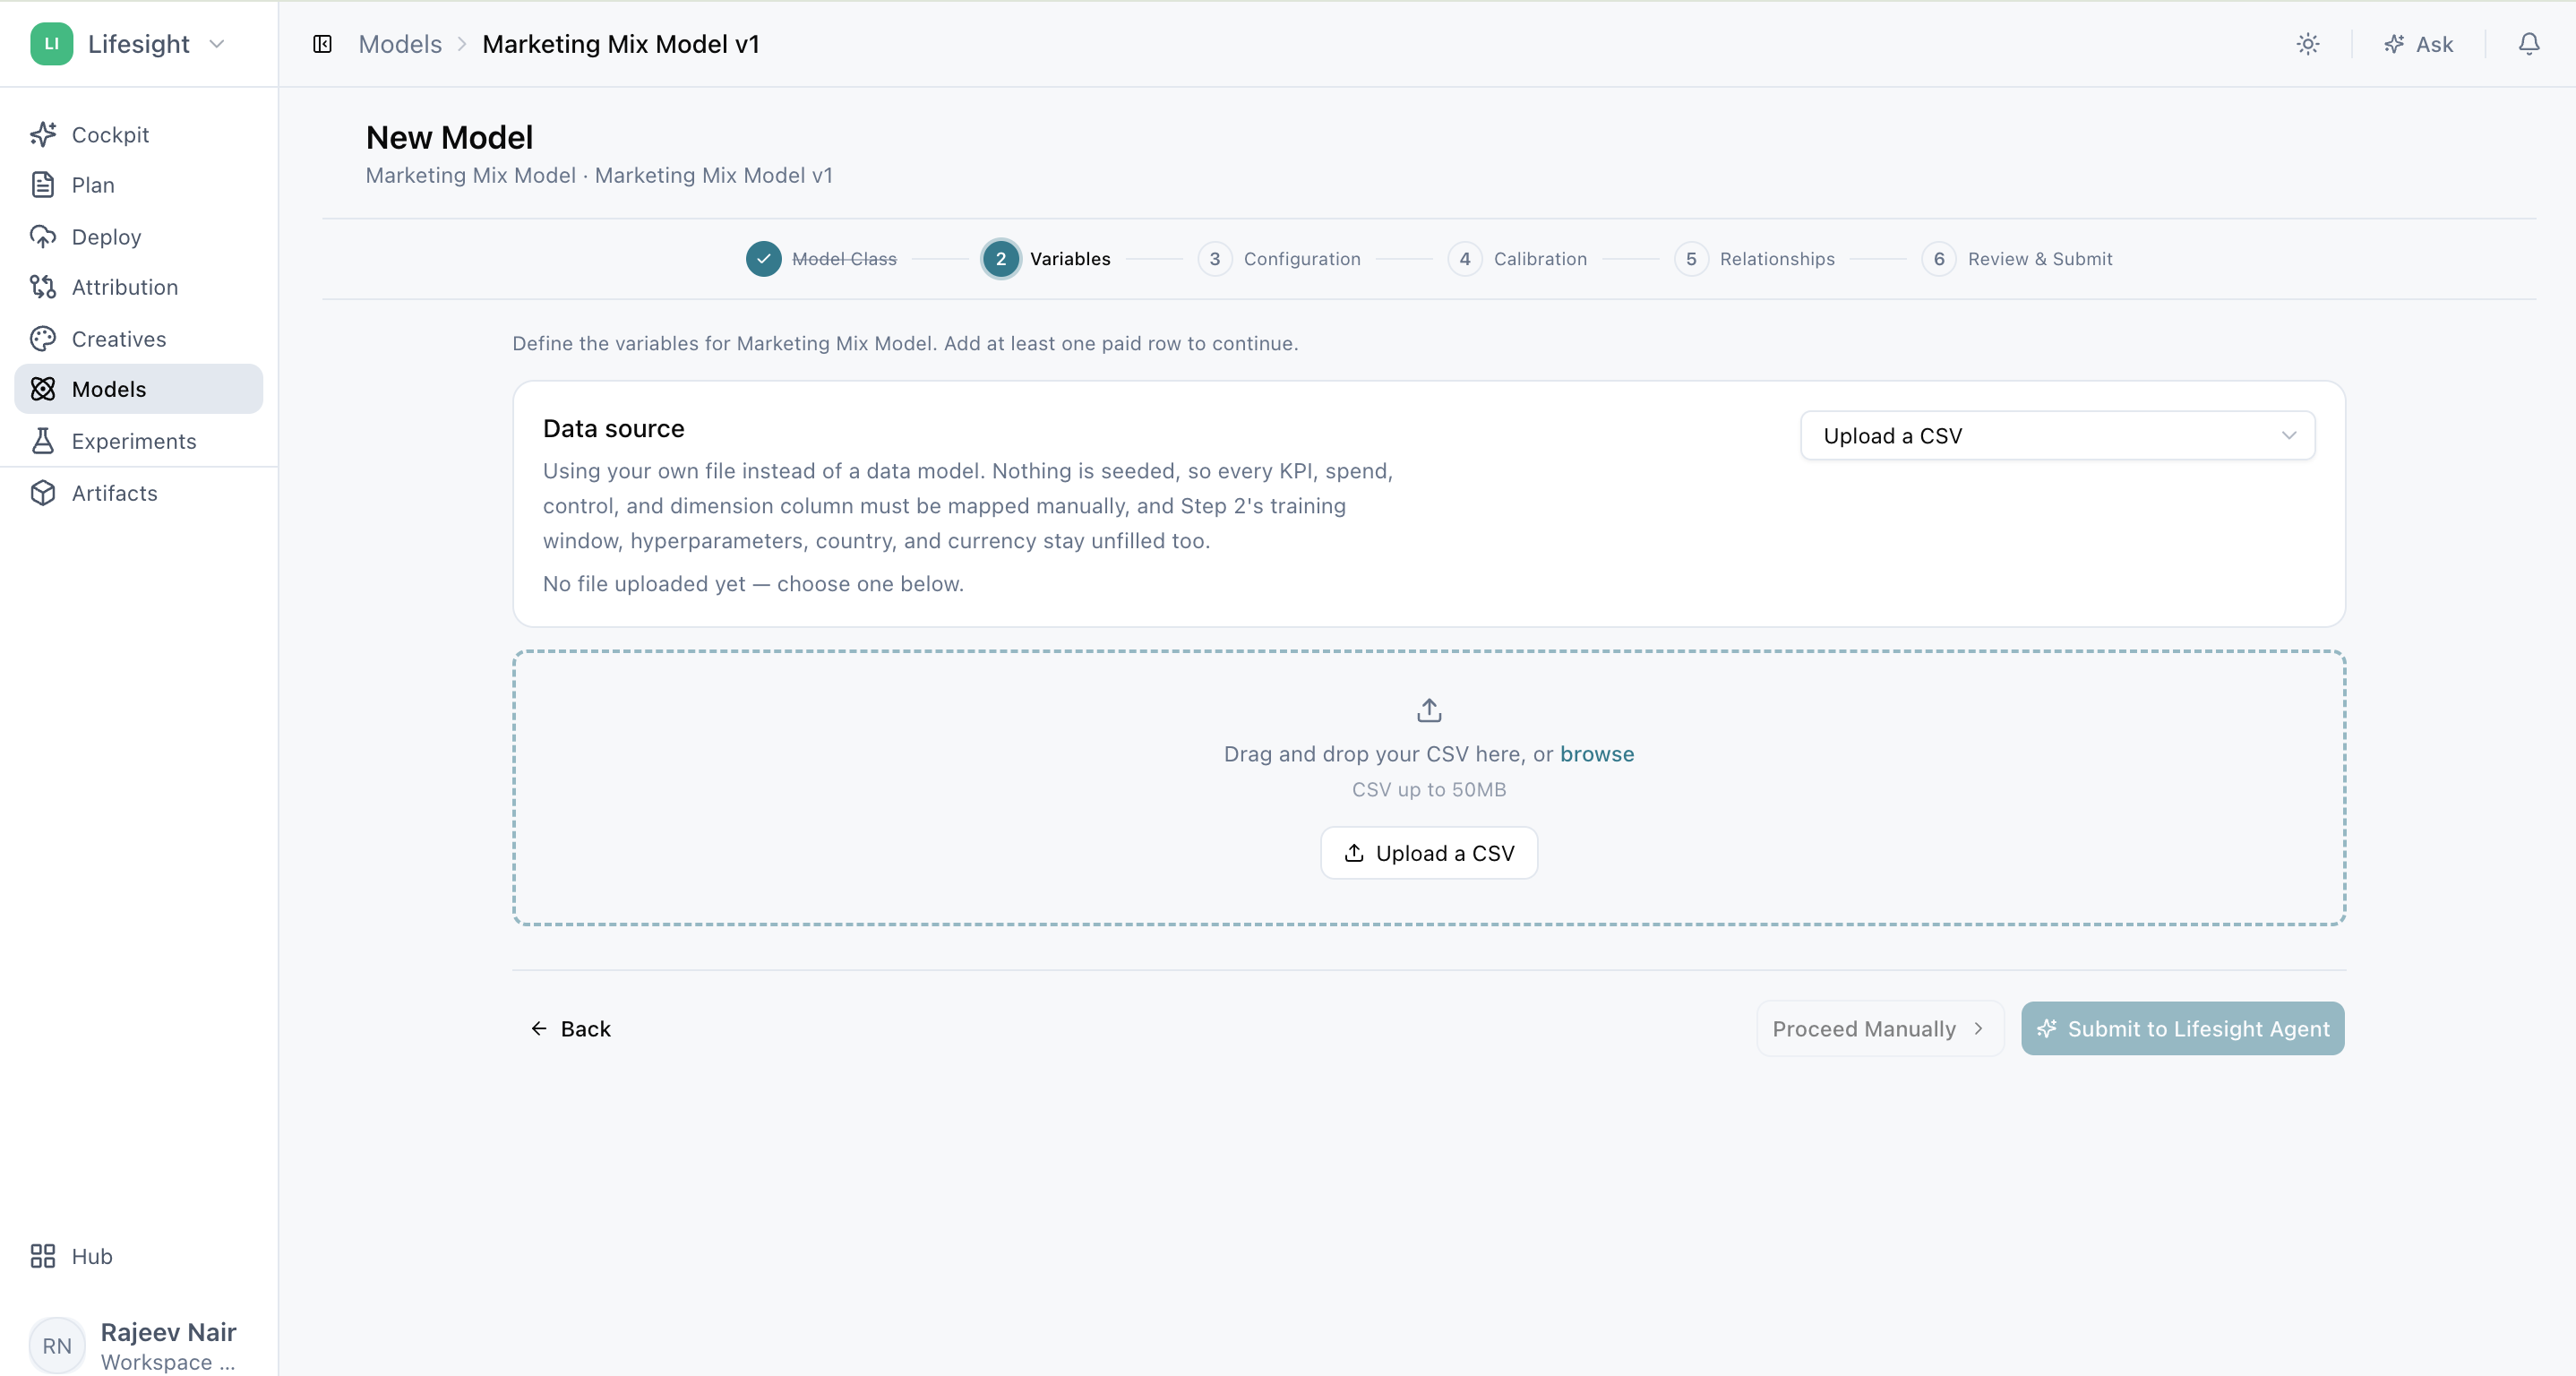
You can also build a model using historical data stored in a CSV file. The file needs to meet the required formatting and validation rules to avoid errors during model creation.
See the CSV Data Formatting Guidelines for details on preparing your file.
Step 1: Start your model and choose what it measures
- Select Models from the sidebar to see every model in your workspace.
- Click Create Model to start a new build.
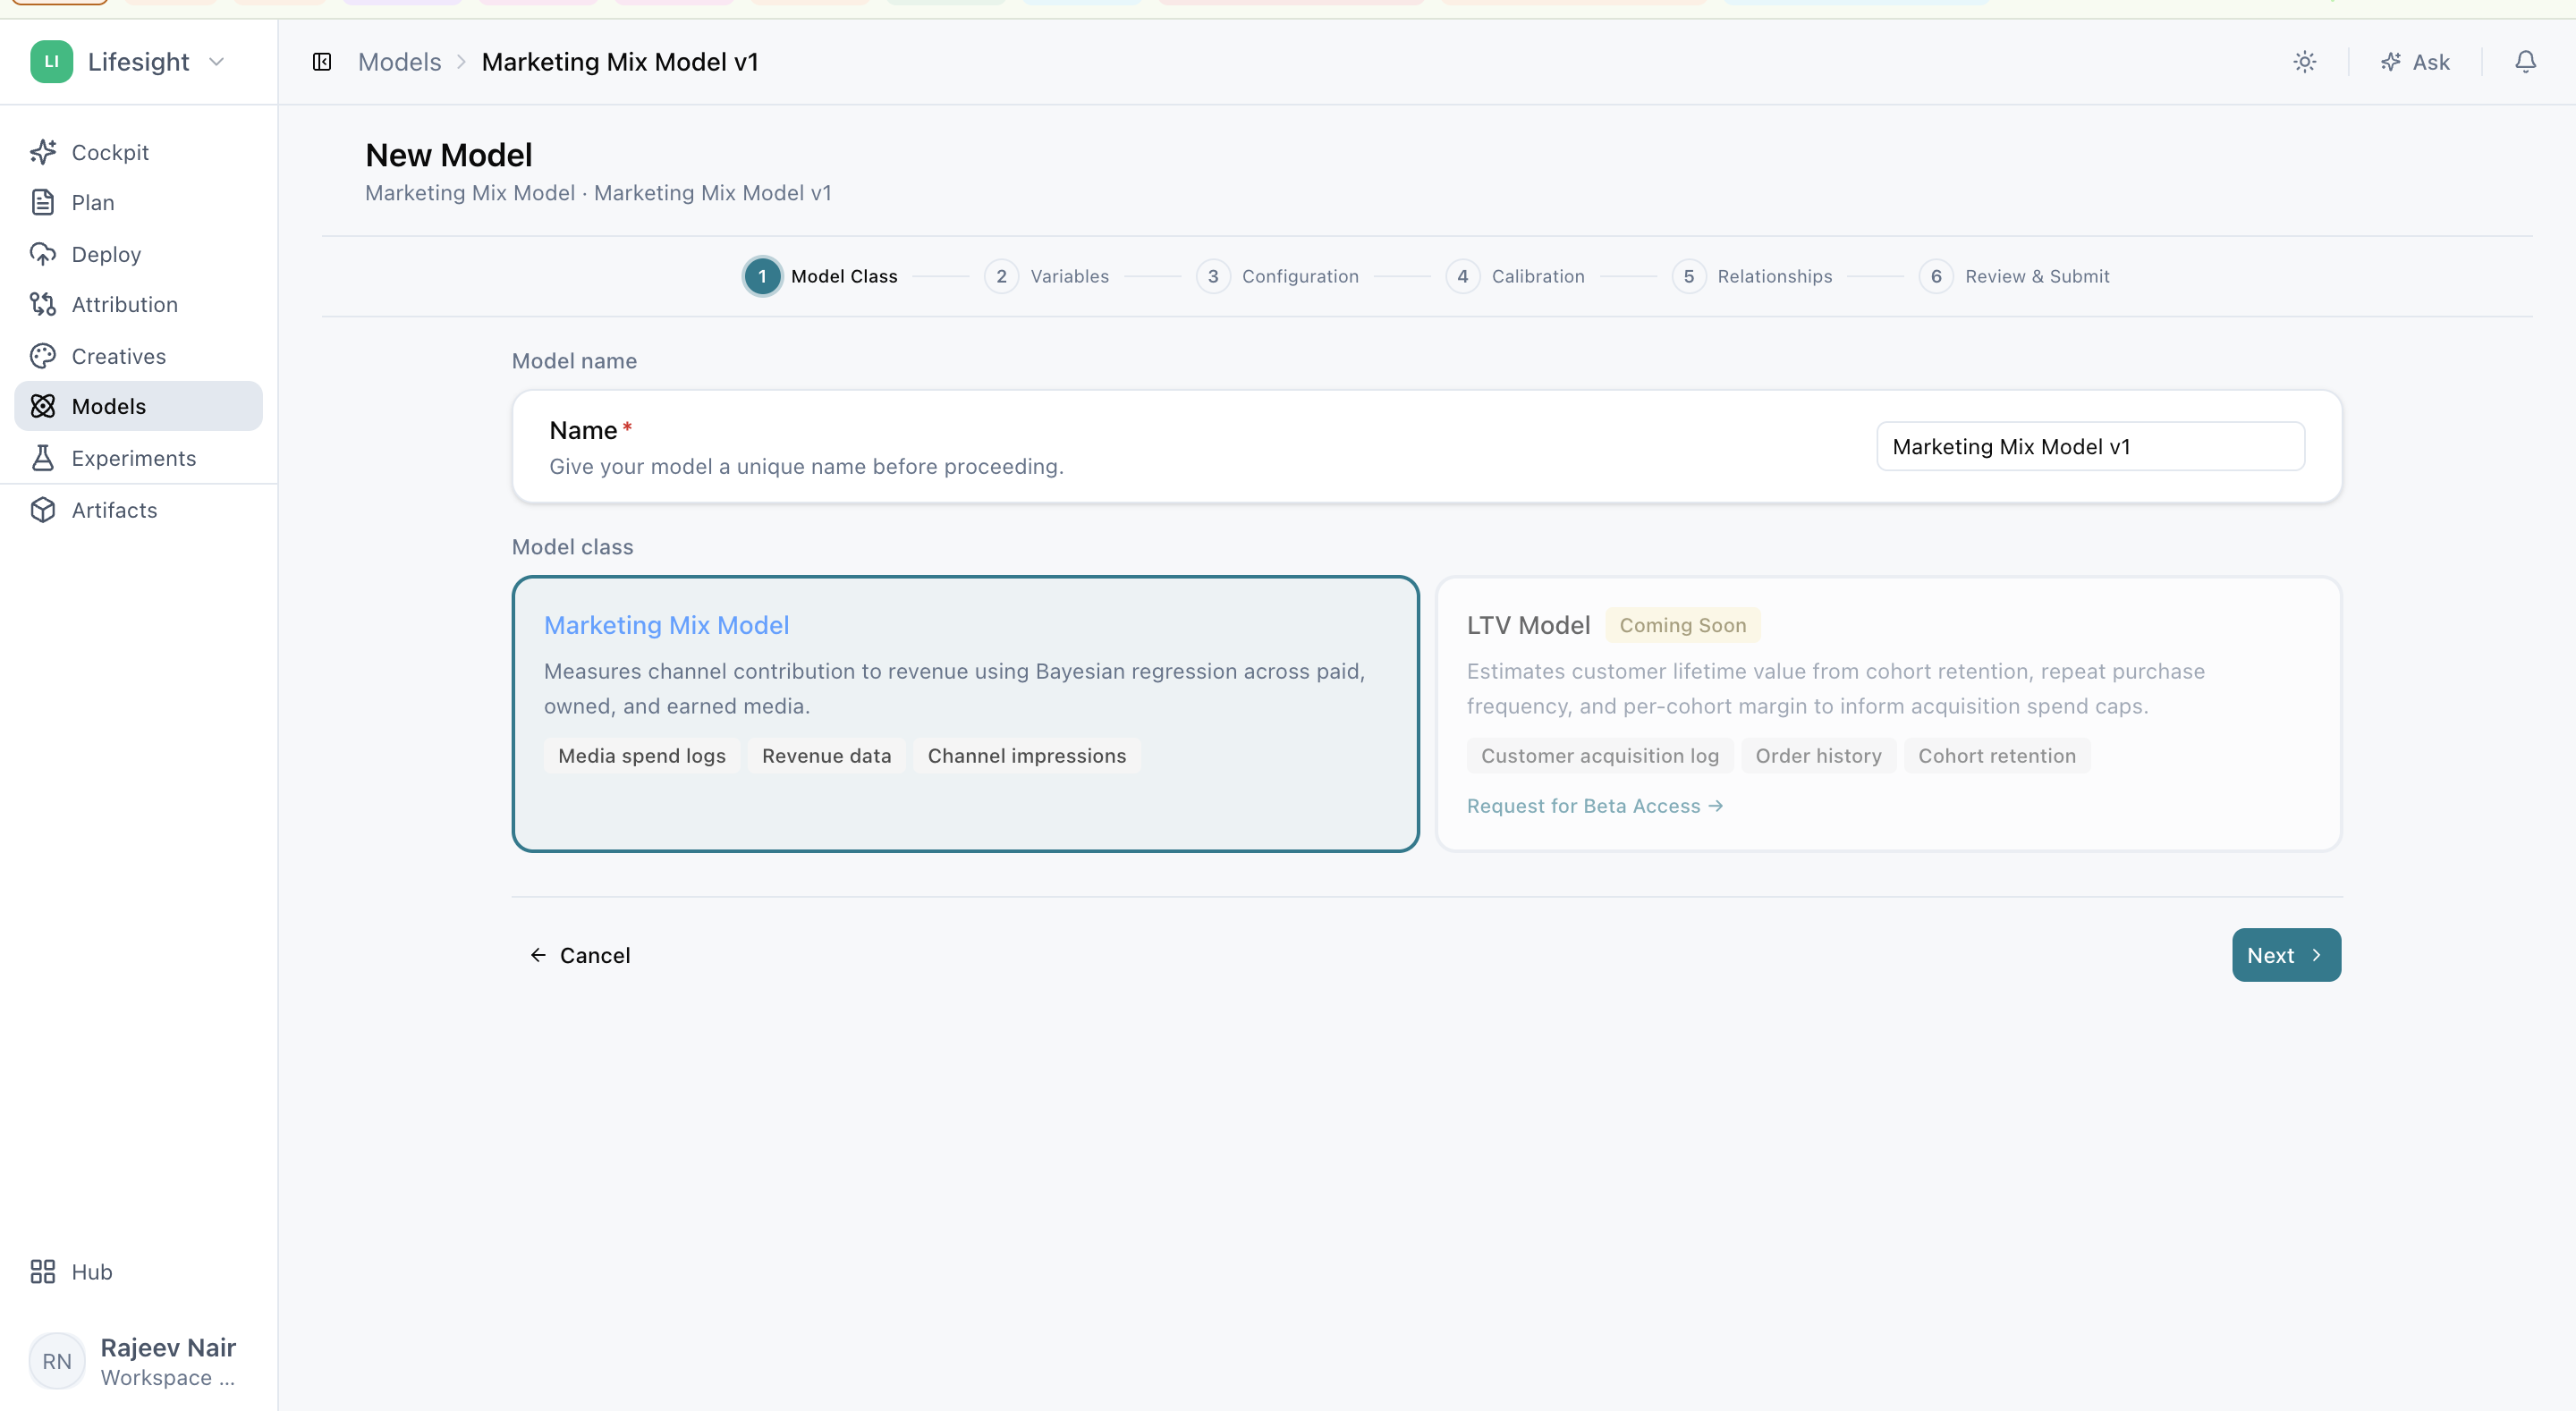
- Give your model a unique, descriptive name so you can tell versions apart later, for example "US Revenue MMM Q3 2026."
- Select Marketing Mix Model as the Model Class. This model type measures how each channel contributes to your outcome across paid, owned, and earned media.
- Click Next to move on to variables.
Step 2: Map your variables so the model reads your data correctly
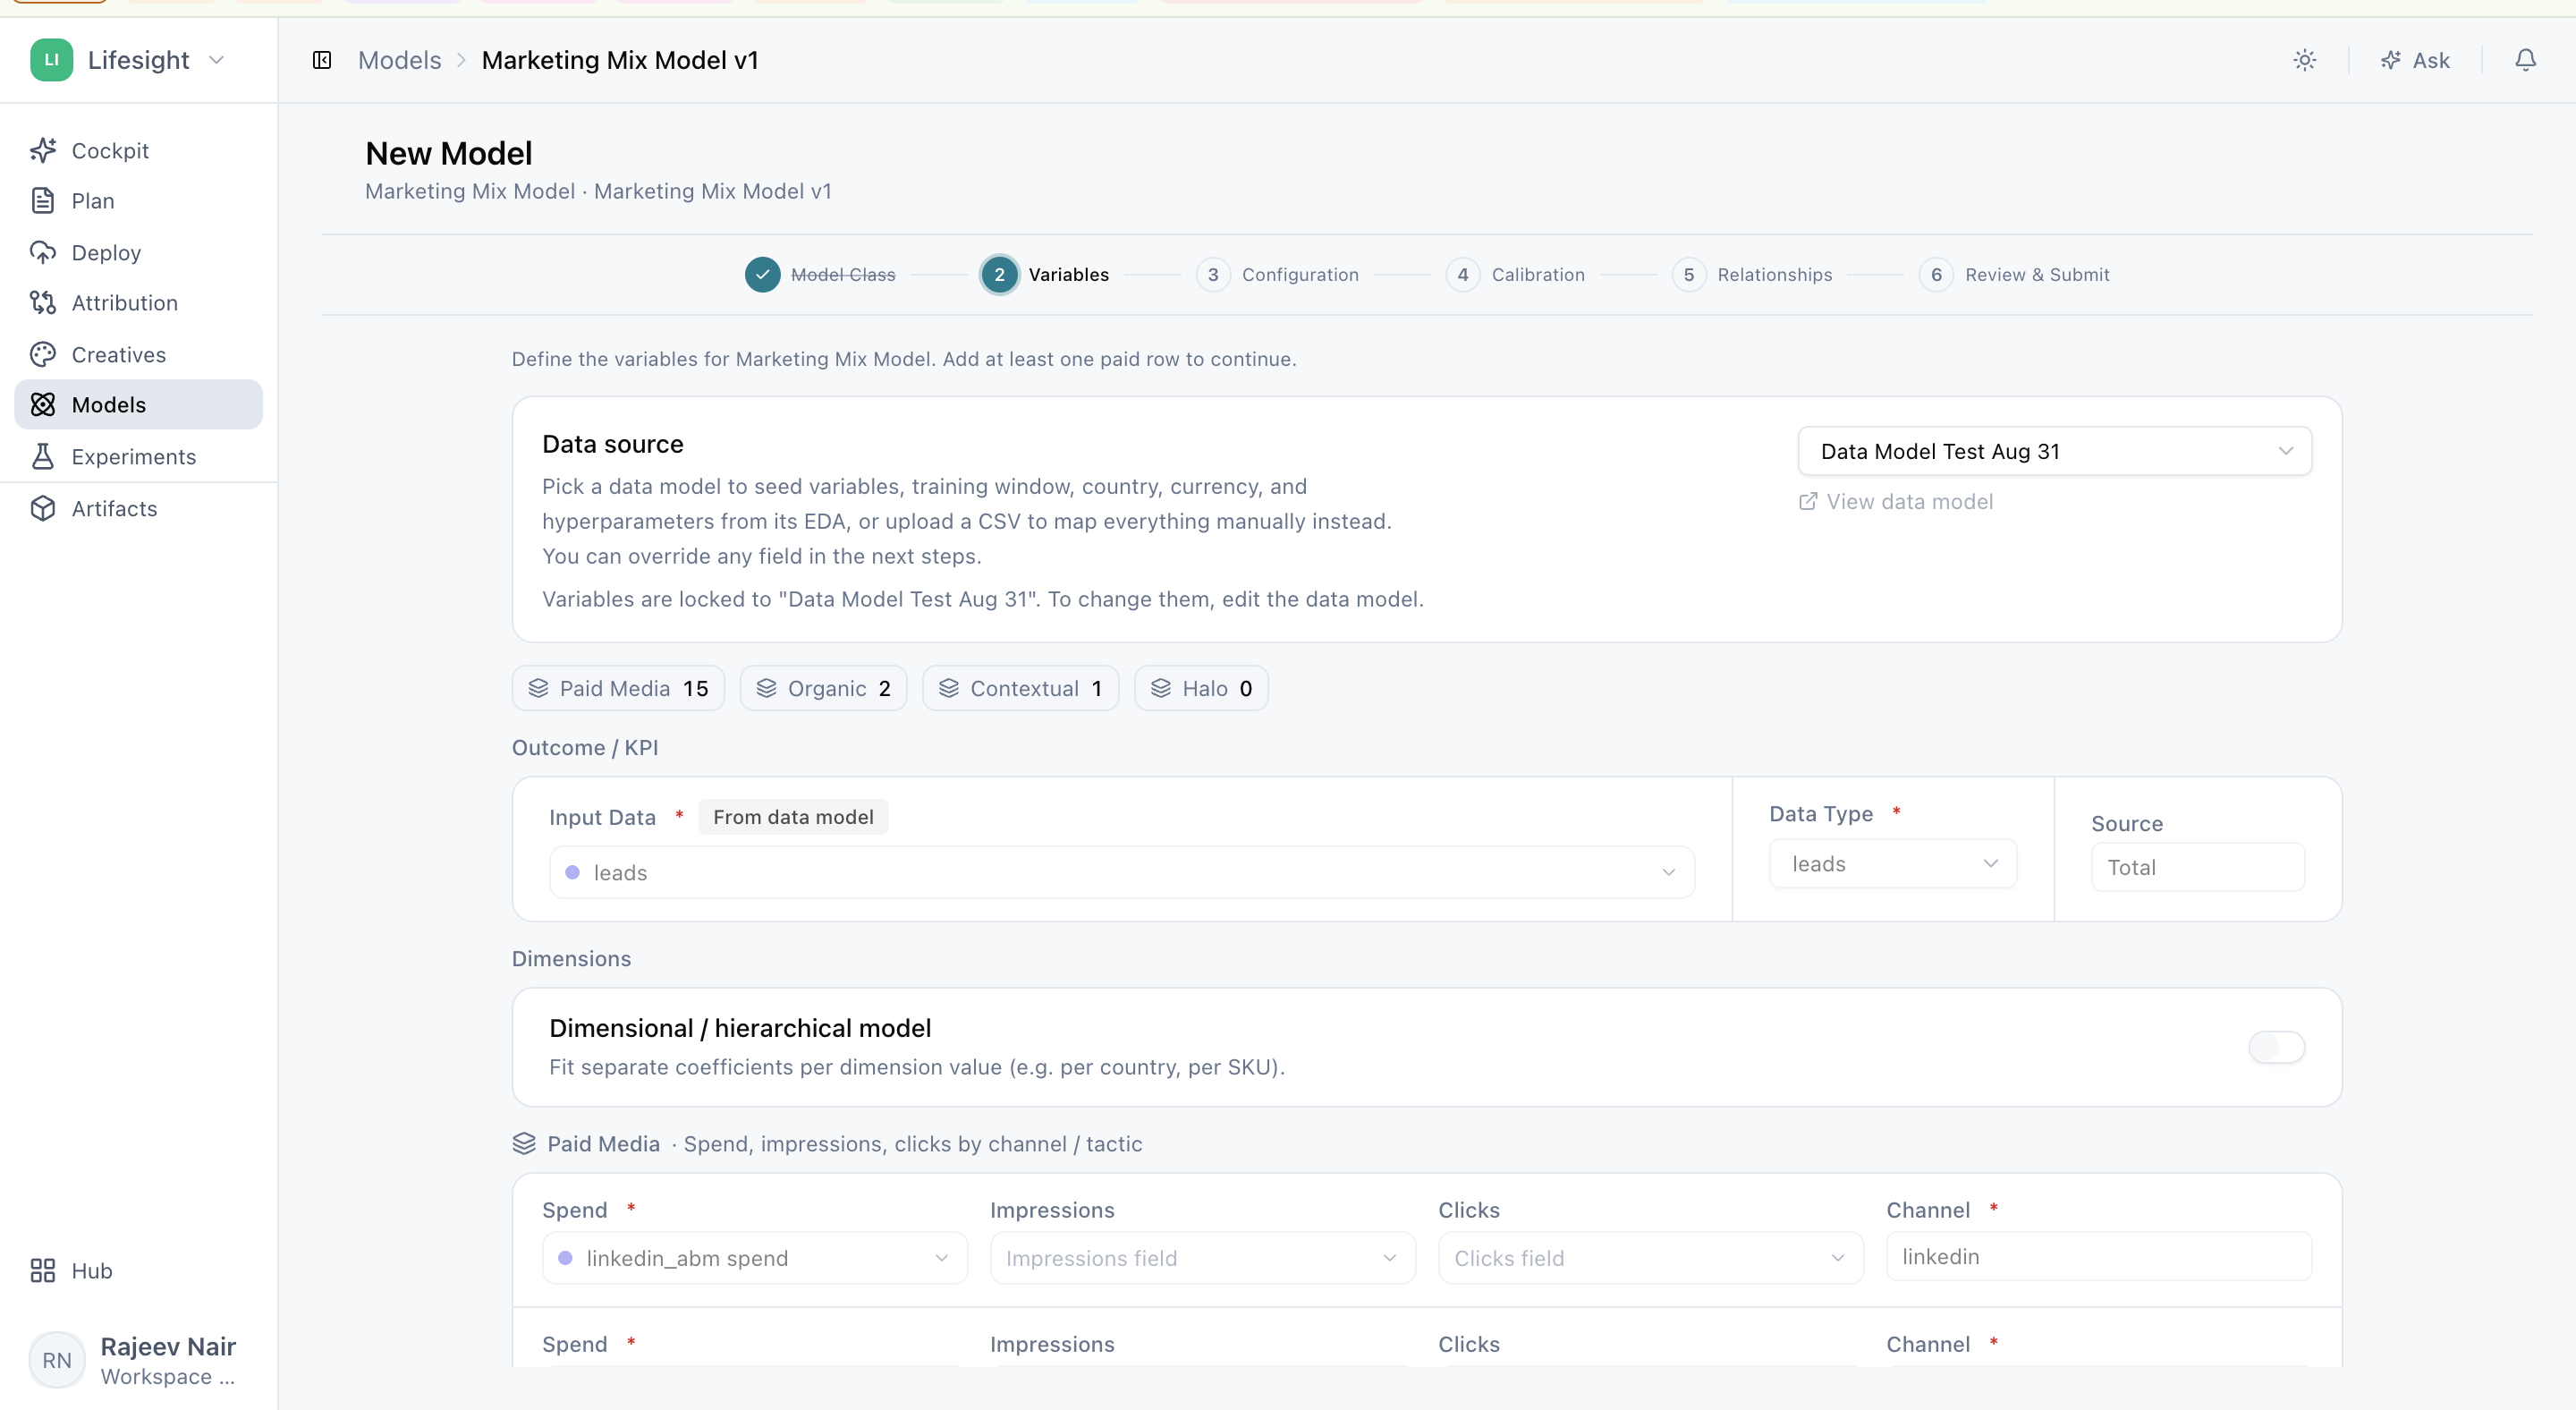
In this step, you select your input data and map its fields to the variables the model needs. This is one of the most important steps, because it decides how the model interprets your data.
Select a data source
Choose one of the following:
- Data Model: Select a Data Model that's already configured in your workspace.
- CSV Upload: Drag and drop or browse for your prepared CSV file.
Map your data features
- Outcome KPI: Select the primary metric you want to measure, such as revenue, orders, or new customers. This is the model's dependent variable (the result the model explains, based on all the other variables).
- Paid Marketing Variables: Add each paid media channel or tactic, then map its spend field. Where available, you can also map impressions and clicks.
- Organic Variables: Map non-paid activity, such as SEO sessions, direct traffic, or email activity.
- Contextual Variables: Map outside factors that influence your results, such as competitor promotions, pricing changes, or promotional events.
- Halo Variables: Add variables that may influence other marketing activity or help explain cross-channel effects, such as brand campaigns that lift search.
- Dimensions: If your data is dimensional (broken down by segments such as country, region, or product line), select the fields the model should use to segment results.
Choose the expected effect of each variable
For organic, contextual, and halo variables, choose a treatment that tells the model how you expect the variable to affect your Outcome KPI:
- Positive: Choose this when the variable is expected to increase your Outcome KPI. For example, your own brand's promotional event.
- Negative: Choose this when the variable is expected to decrease your Outcome KPI. For example, a major competitor's promotional campaign.
- Neutral: Choose this when you're unsure, or want the model to determine the effect on its own.
Once mapping is complete, click Proceed Manually.
Step 3: Configure your model settings for accurate results
Next, set the core parameters for your model's analysis.
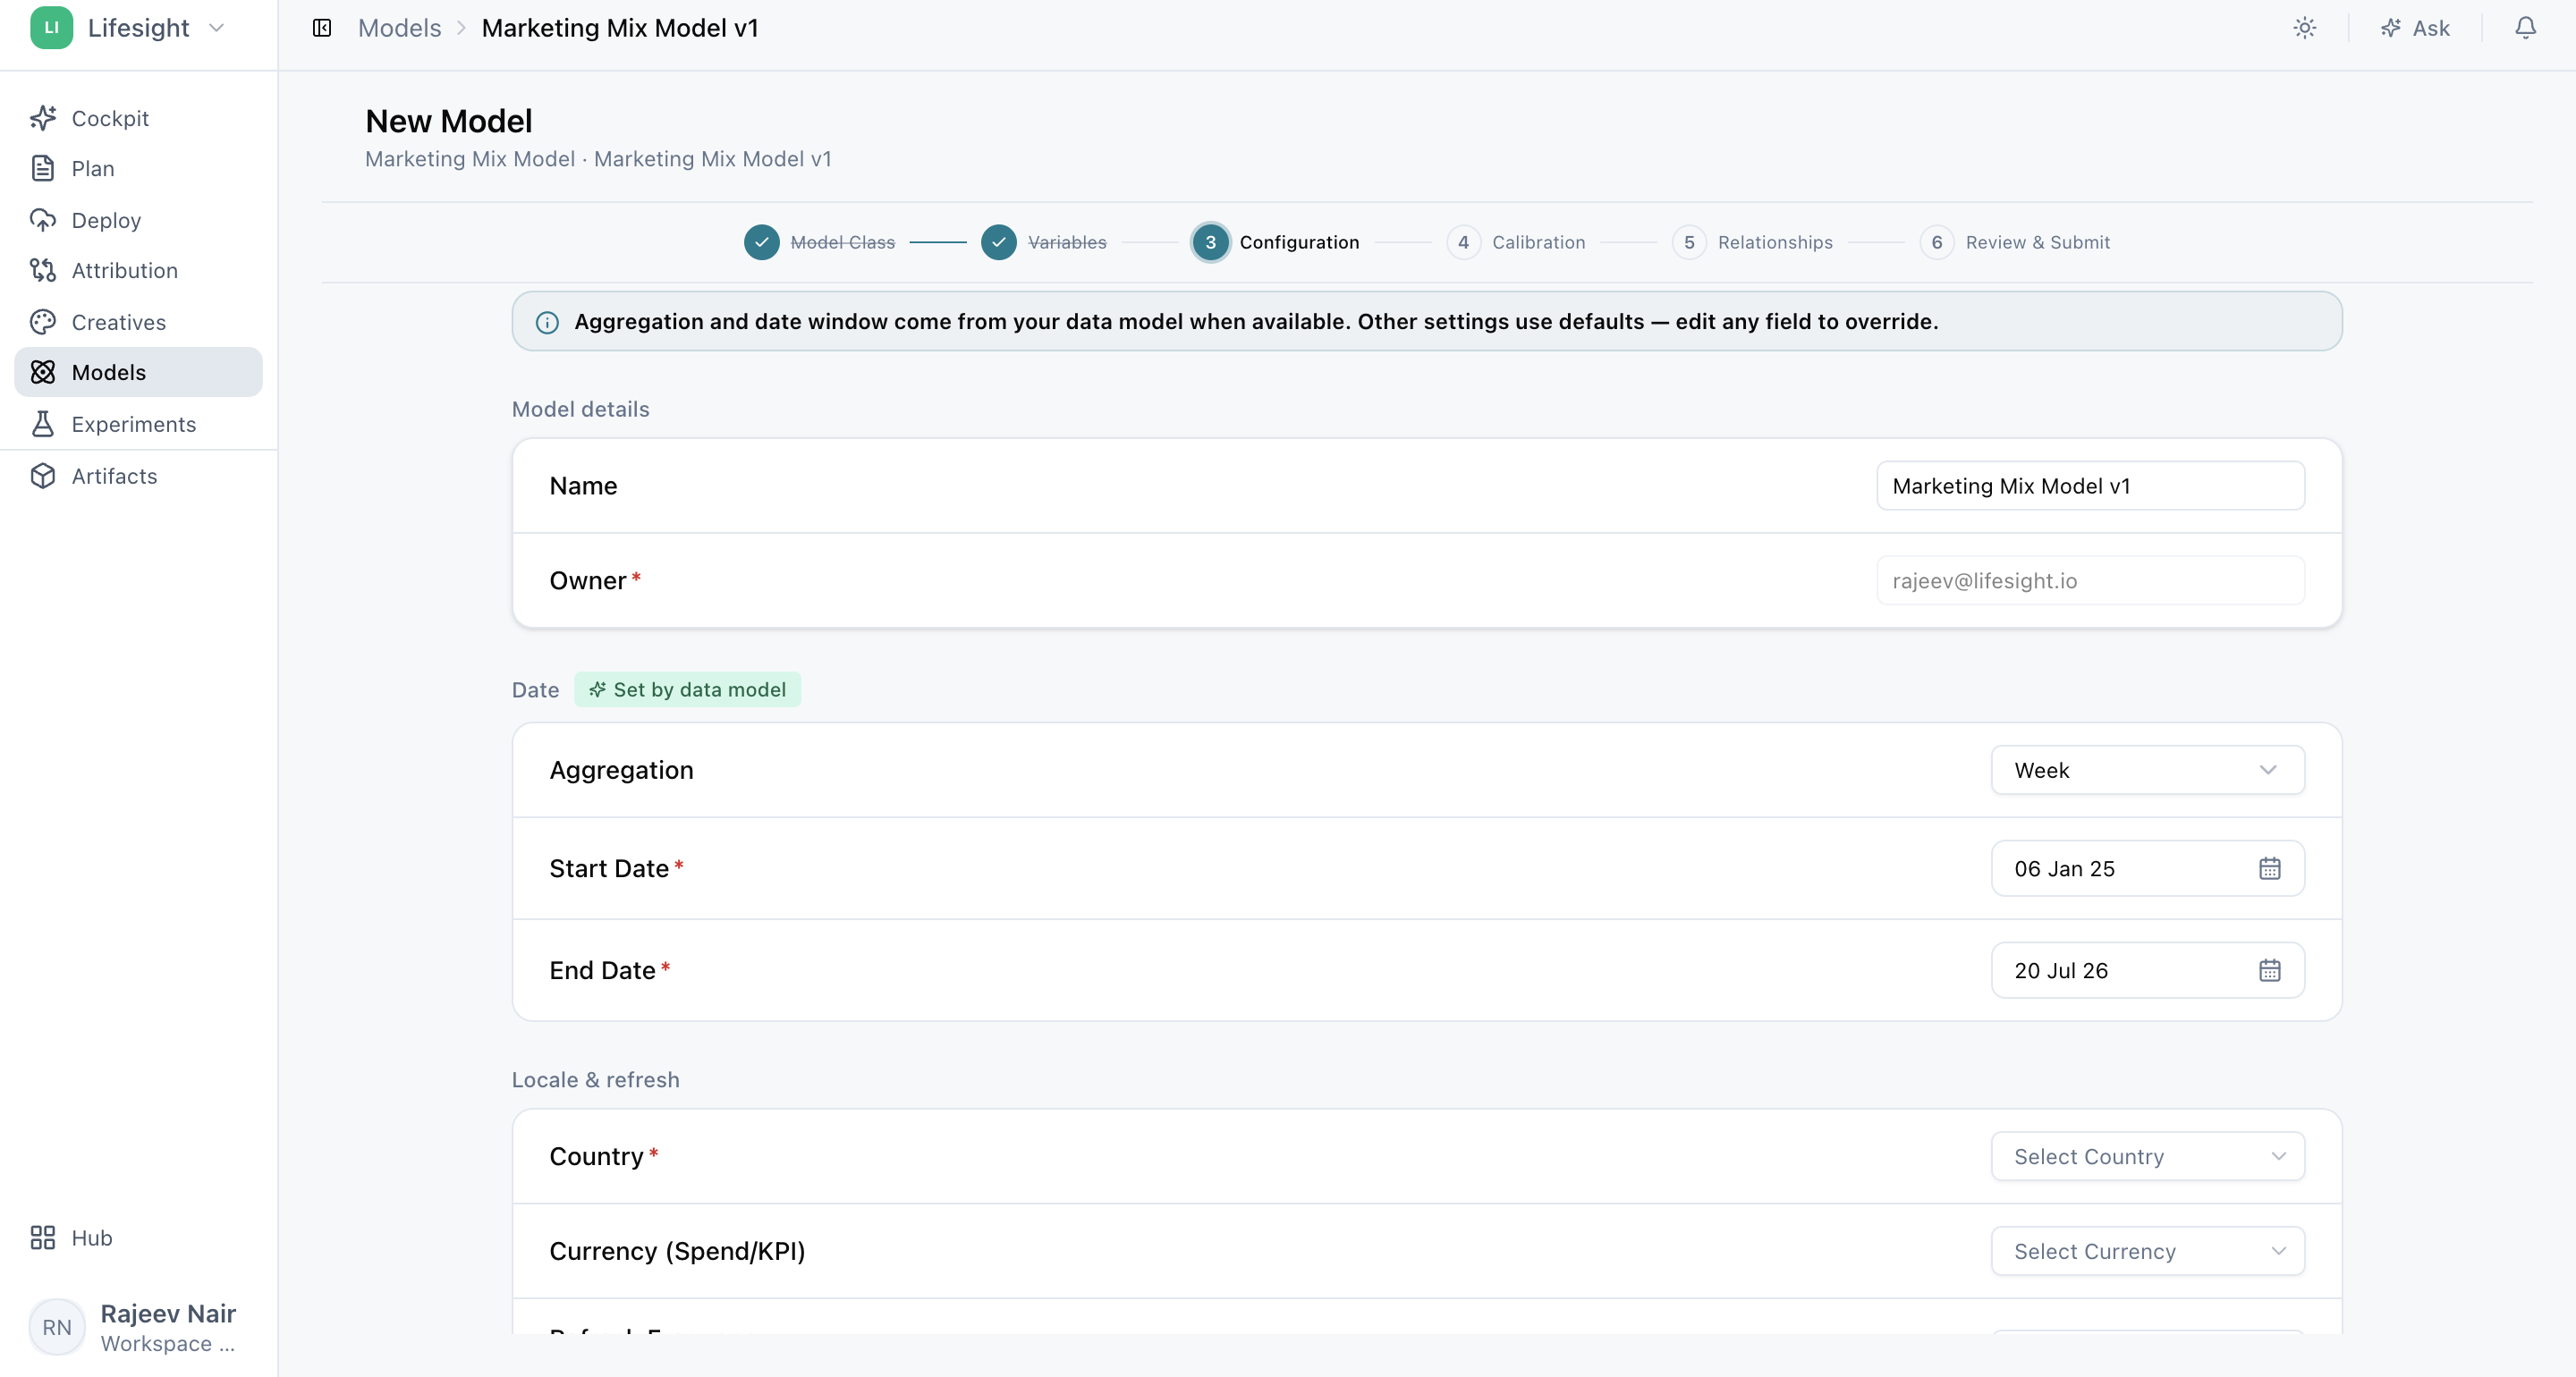
- Model Details: Confirm the model name. The model owner is filled in automatically and can't be edited.
- Aggregation: Select Daily, Weekly, or Monthly to match how your input data is grouped over time.
- Date Range: Confirm the start and end dates for the model's analysis.
- Country & Currency: Select your primary country and reporting currency. Choosing a country helps the model account for national holidays.
- Pre-configured Variables: Turn contextual factors such as Seasonality, Weekdays, Holidays, and Trend on or off. Keeping the relevant factors turned on helps improve model accuracy.
- Refresh Frequency: Choose how often the model updates with new data.
- Training Size: Select the percentage or range of data used to train the model. The remaining data is used for validation, which tests how accurately the model predicts results it hasn't seen.
Fine-tune media behavior with advanced settings
Advanced settings are designed for data scientists and advanced users who want to fine-tune the model's underlying parameters. For each paid media tactic, you can review and change its Adstock and Saturation settings.
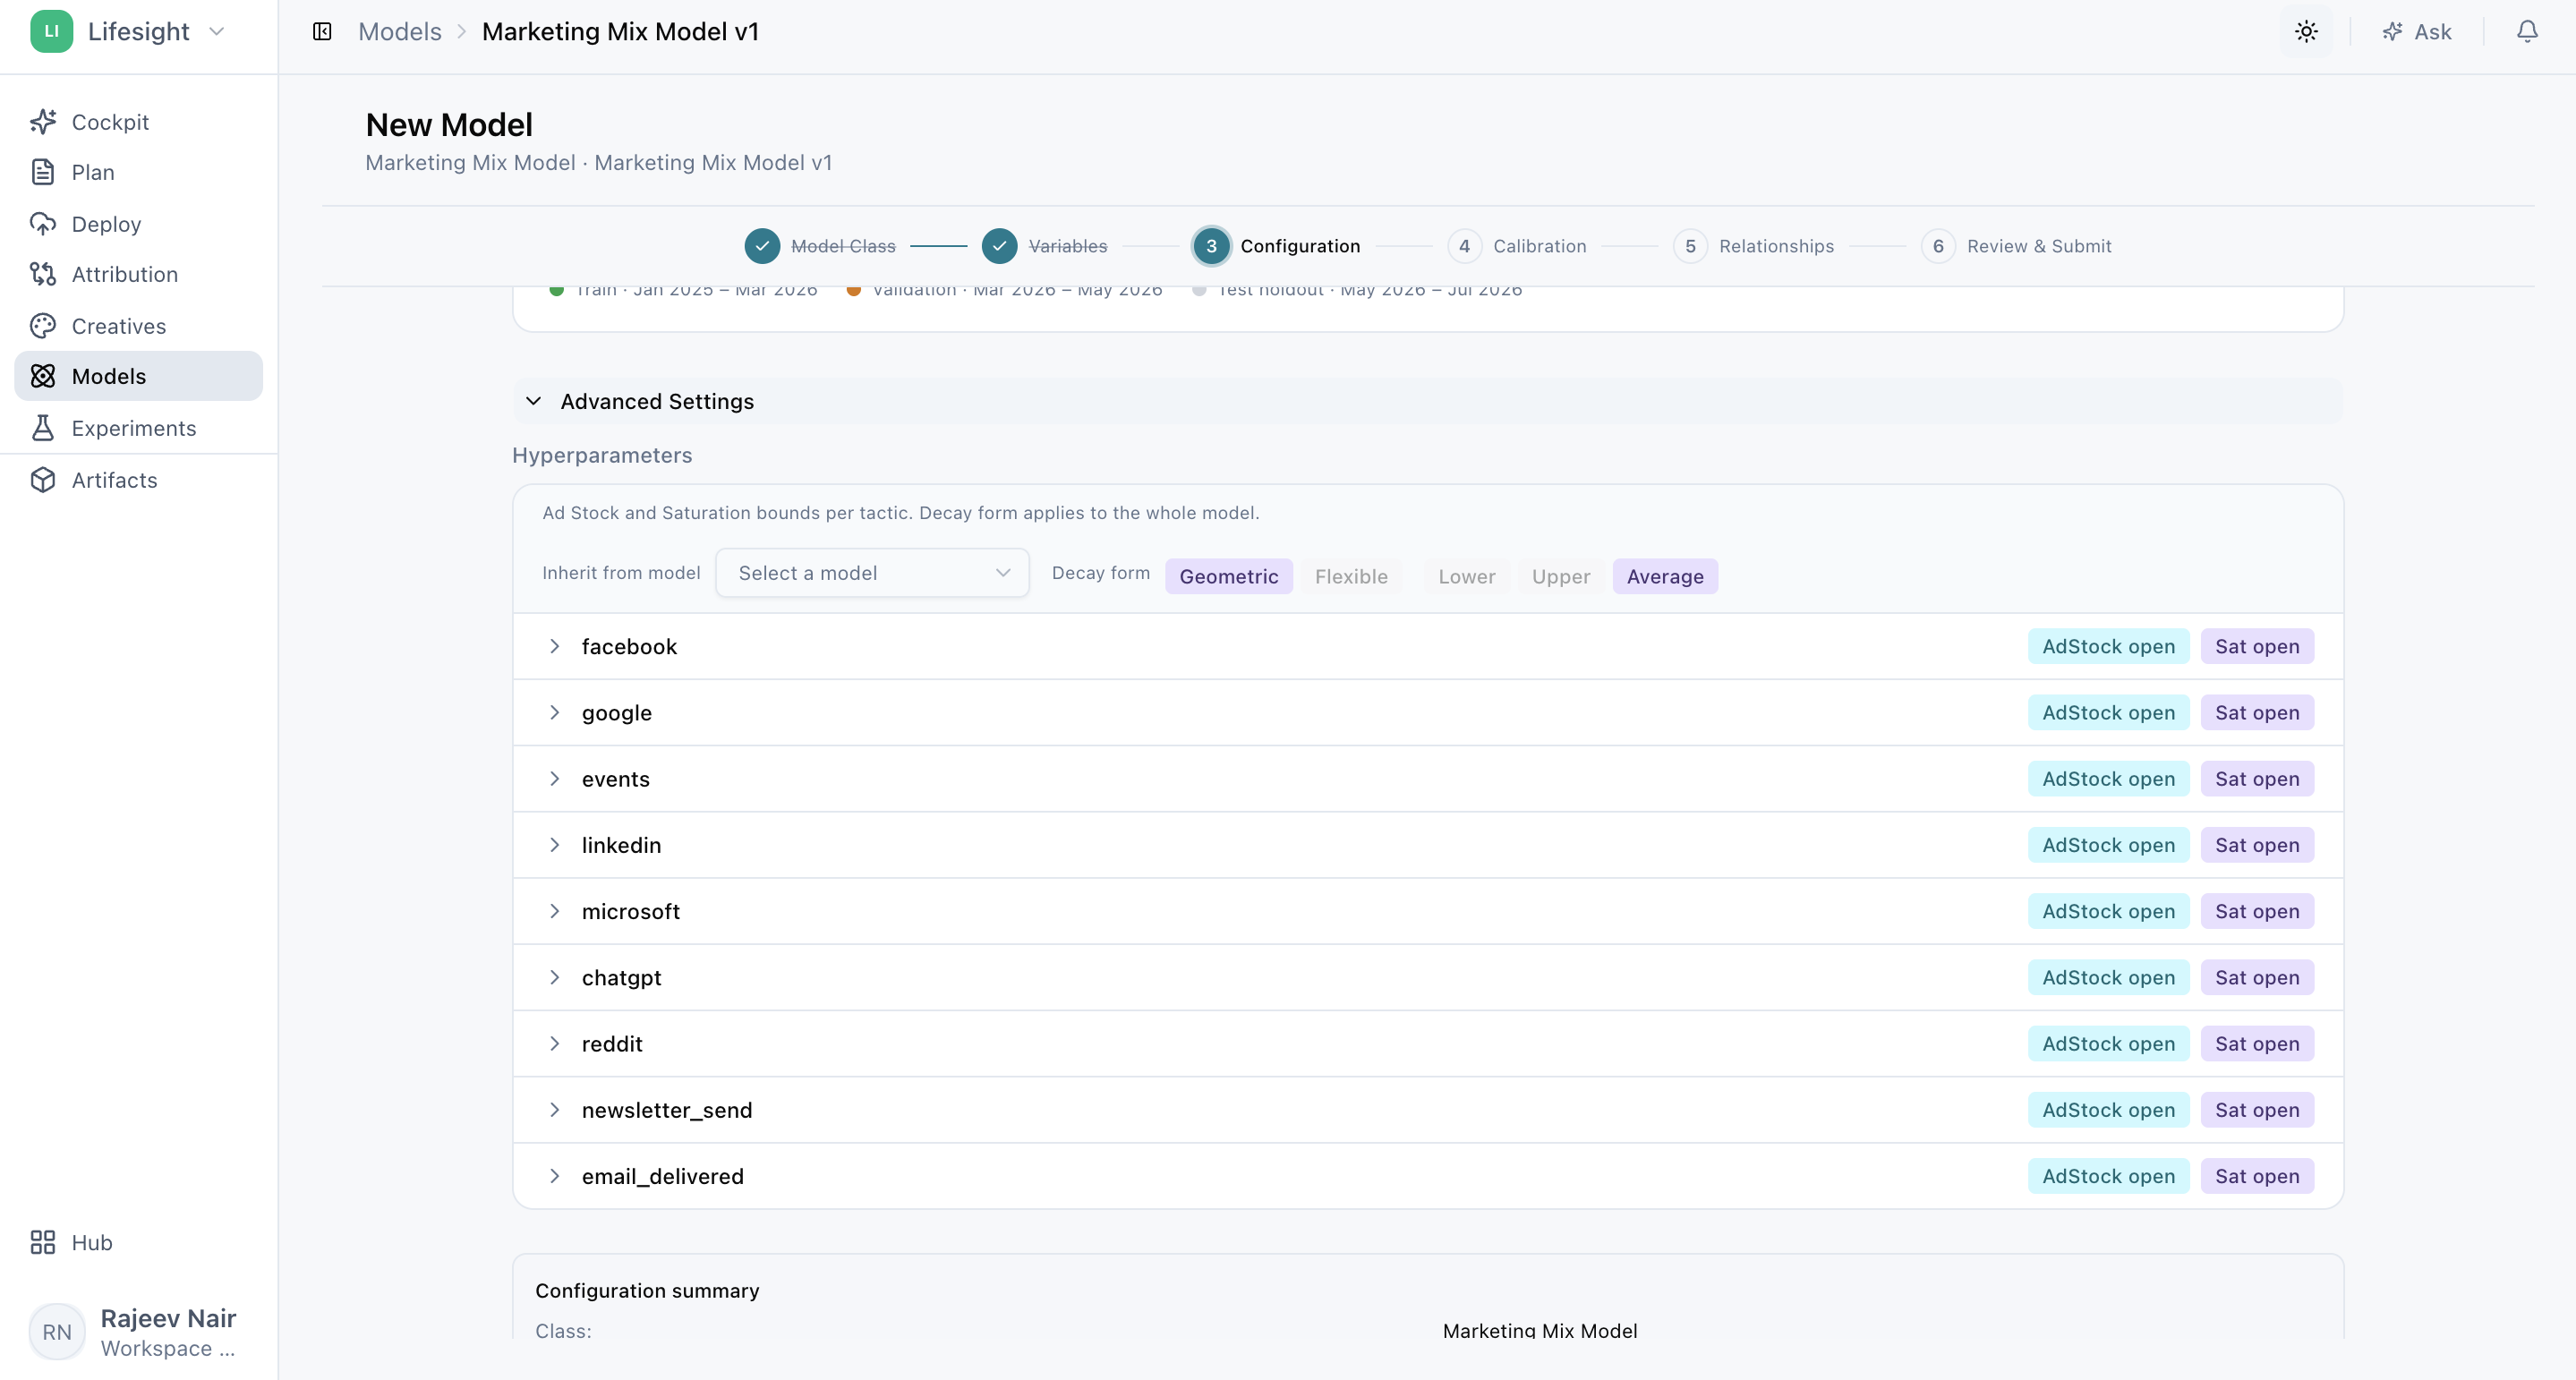
- Adstock: Accounts for the delayed or carryover effect of advertising, where an ad keeps influencing results after it runs. Choose one of two methods:
- Geometric: A simple decay model, where the effect fades by the same rate over time.
- Flexible (Weibull PDF): A more versatile method that can capture complex patterns, such as effects that peak a few days after an ad runs before fading.
- Saturation: Models diminishing returns, where extra spend on a channel stops producing proportional increases in your KPI.
- Inherit from Model: Where available, use settings from a previous model as a starting point.
Keep the default advanced settings unless you have a specific modeling reason to change them.
Step 4: Calibrate your model with real-world experiment results
If you've run recent marketing experiments, such as lift studies or geo experiments, you can use their results to calibrate your model. Calibration anchors the model's estimates to observed incrementality (the lift your experiments actually measured), which can improve the accuracy of its results.
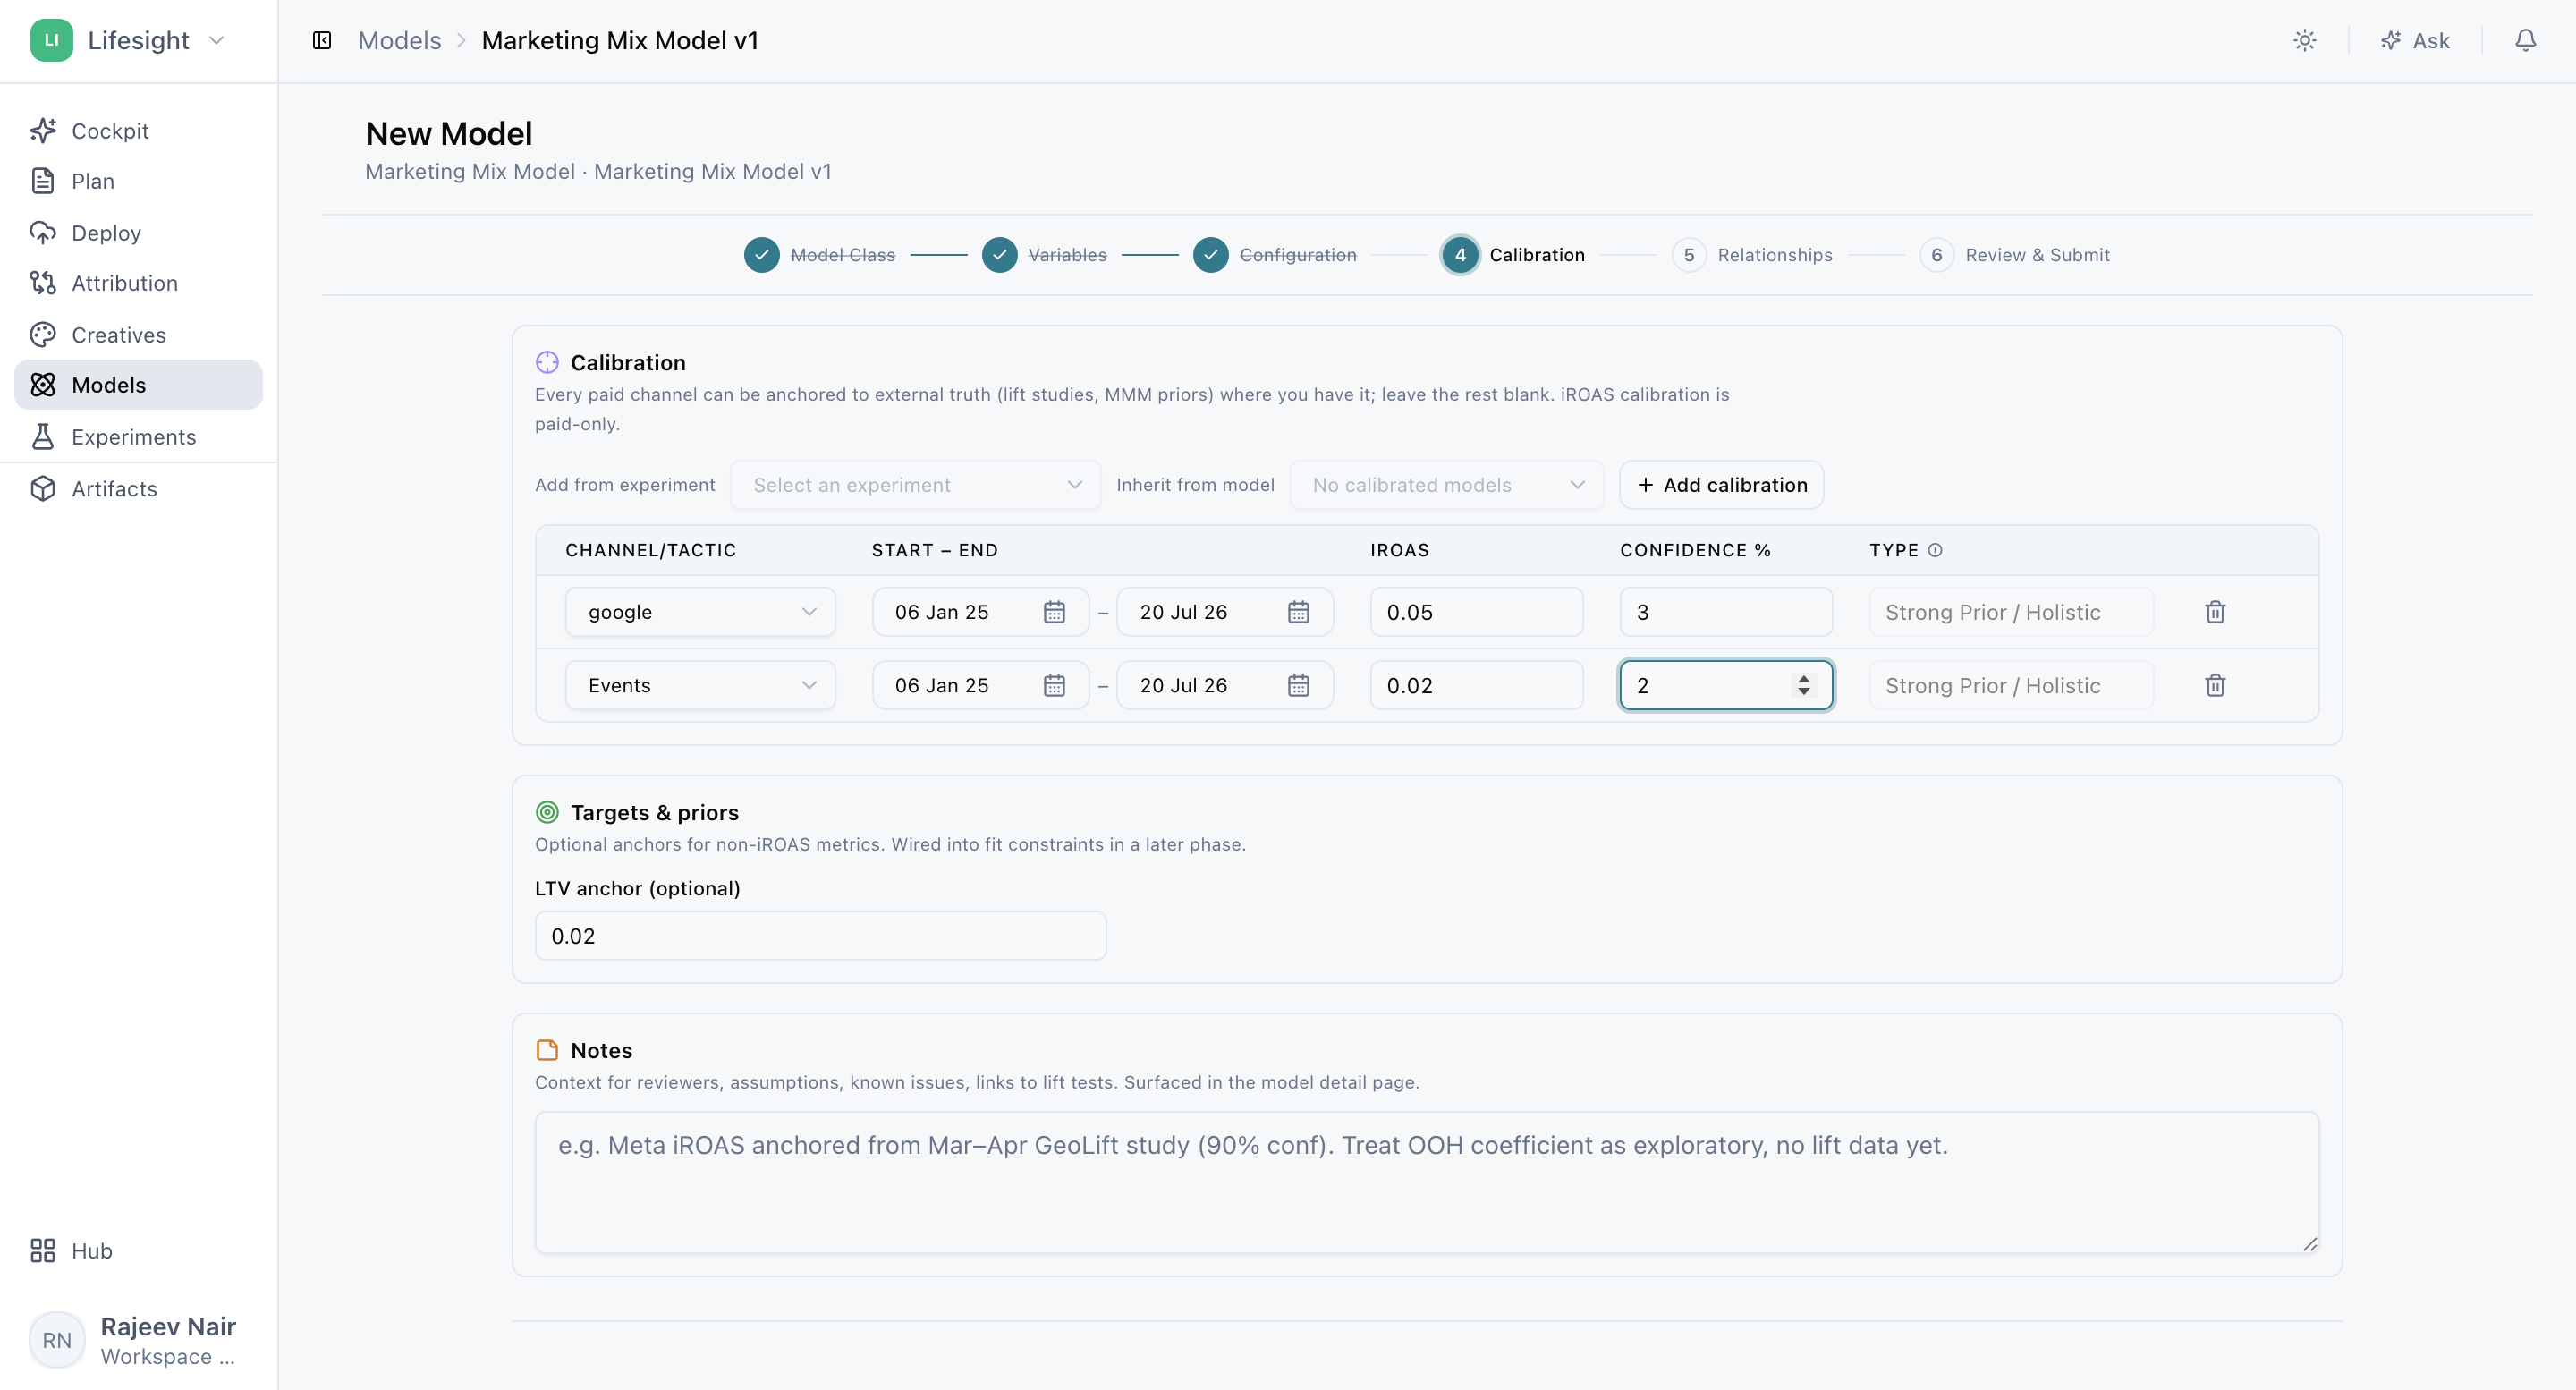
To add a calibration entry:
- Click Add calibration.
- Select the paid media channel or tactic the experiment tested.
- Enter the experiment's start and end dates.
- Enter the observed Incremental ROAS (the incremental revenue generated for each dollar spent, as measured by the experiment).
- Enter the Confidence percentage for the experiment result.
Lifesight automatically determines the calibration type based on the experiment dates and your model's training window. You can enter experiment results manually or inherit eligible calibration entries from an existing model. Adding results directly from Experiments isn't available yet.
Calibration is optional. If you don't have suitable experiment results, continue to the next step without adding an entry.
Step 5: Define causal relationships so the model reflects how your marketing really works
This step sets up the causal links between your input variables and your Outcome KPI. The relationships you define help the model understand which factors may influence each other and the final result.
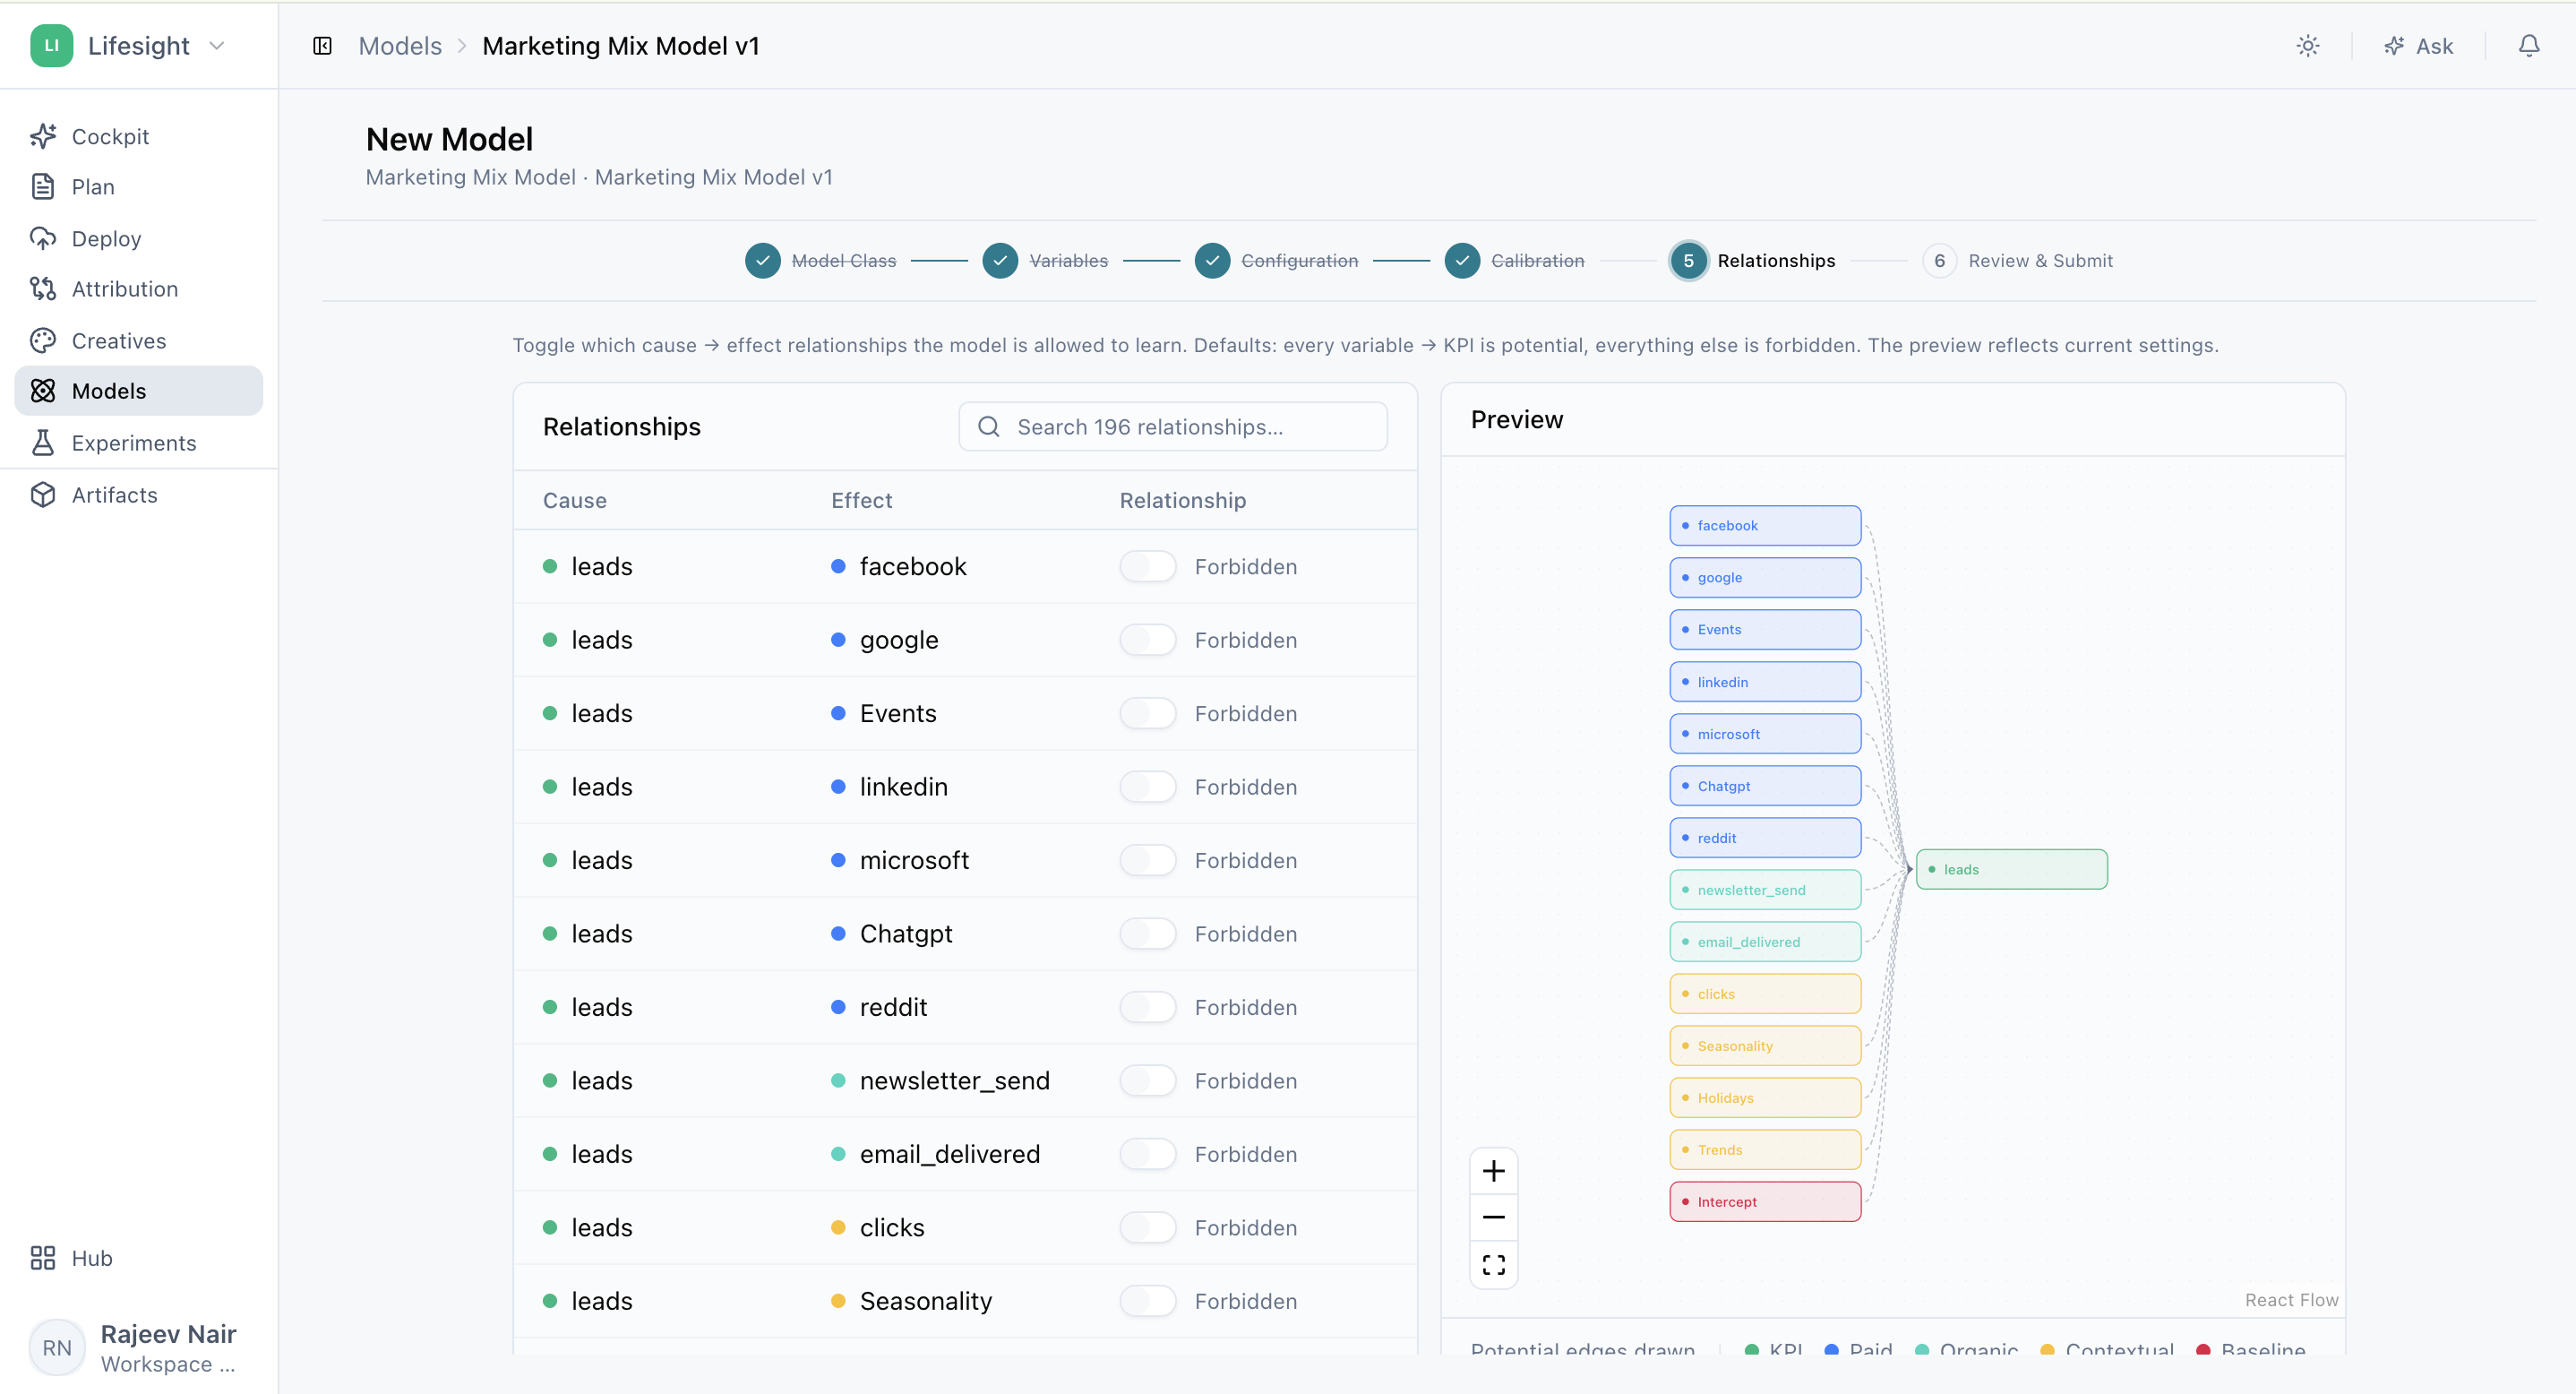
You'll see two sections: the Relationships table on the left and a visual Preview map on the right.
- Review the relationship pairs: Each row shows a possible relationship between a Cause variable, such as Facebook spend, and an Effect variable, such as orders.
- Set each relationship: Use the toggle to classify each pair:
- Potential: Choose this when the Cause variable may influence the Effect variable.
- Forbidden: Choose this when the relationship shouldn't be considered by the model. For example, orders can't cause Facebook spend.
- Check the visual preview: The graph updates as you change relationships. Use it to confirm the connections and direction of influence make sense for your business.
- Click Next once you've reviewed the relationships.
Step 6: Review and submit your model
Review the model summary before submitting.
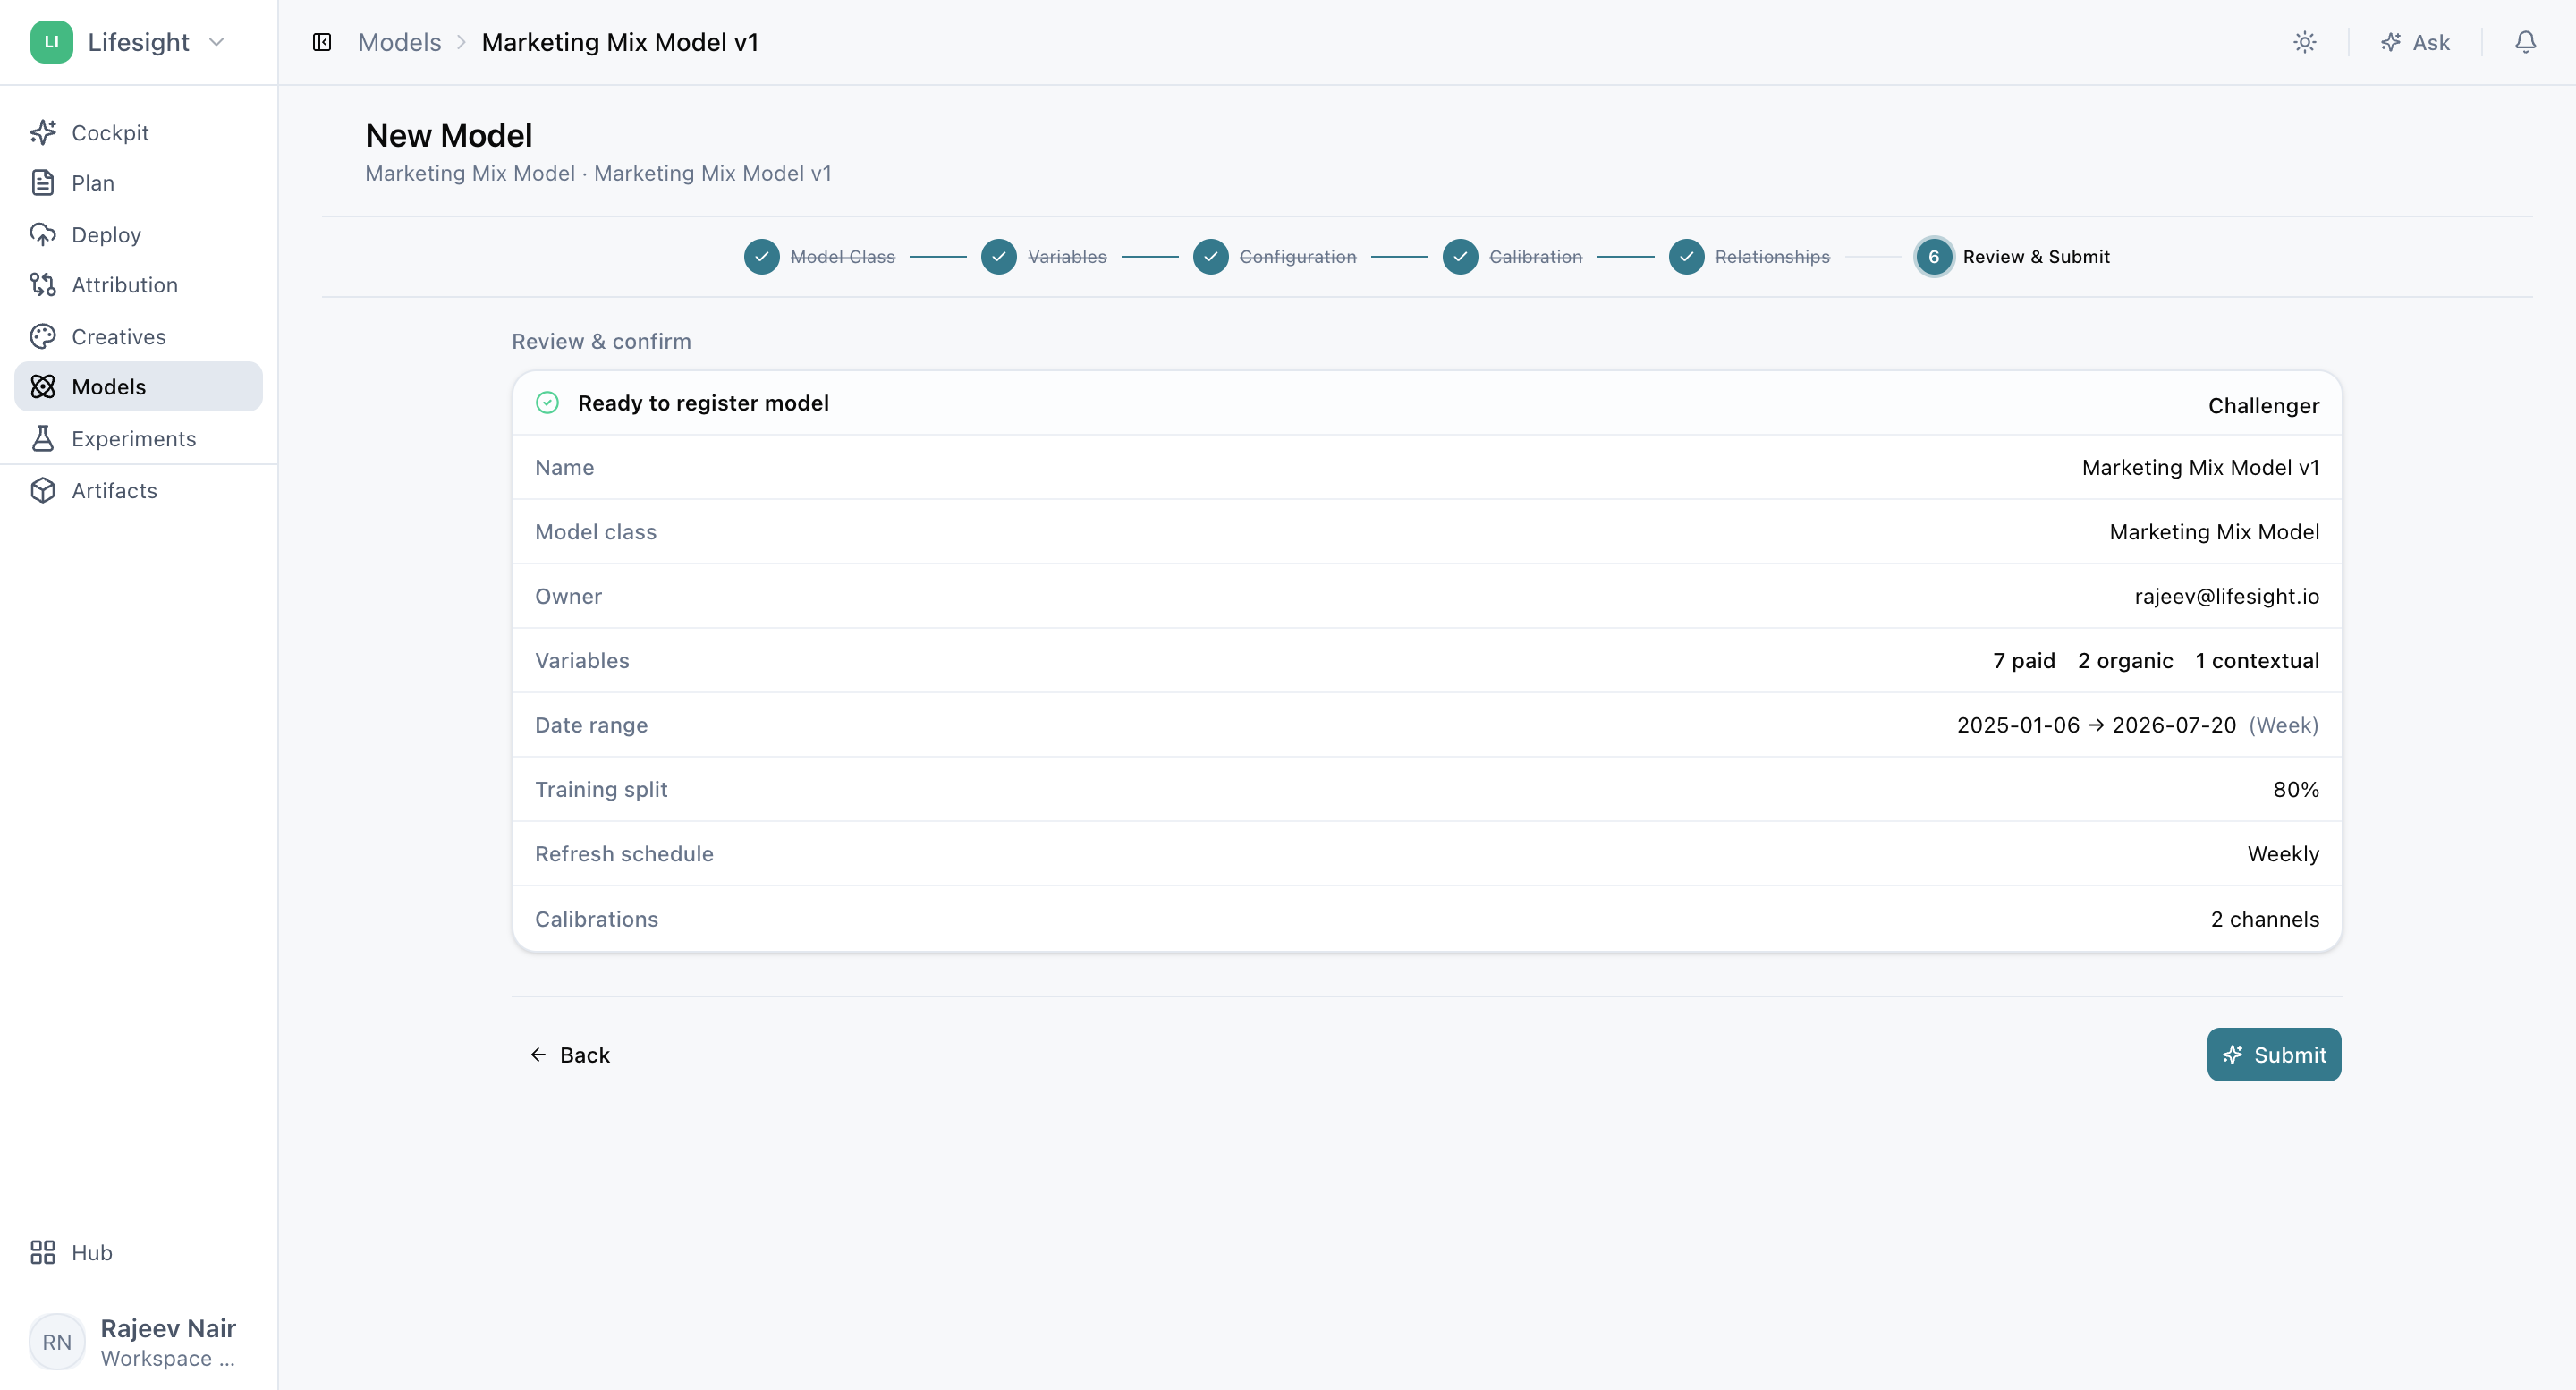
Confirm the following:
- Model name, class, and owner
- Paid, organic, contextual, and halo variables
- Analysis date range and aggregation
- Training size and refresh frequency
- Calibration entries
If any required information is missing, go back to the relevant step and complete it. When your model is ready, click Submit to start the model run.
Your model appears in the Models list with its current processing status, and you'll be notified when the run completes successfully.
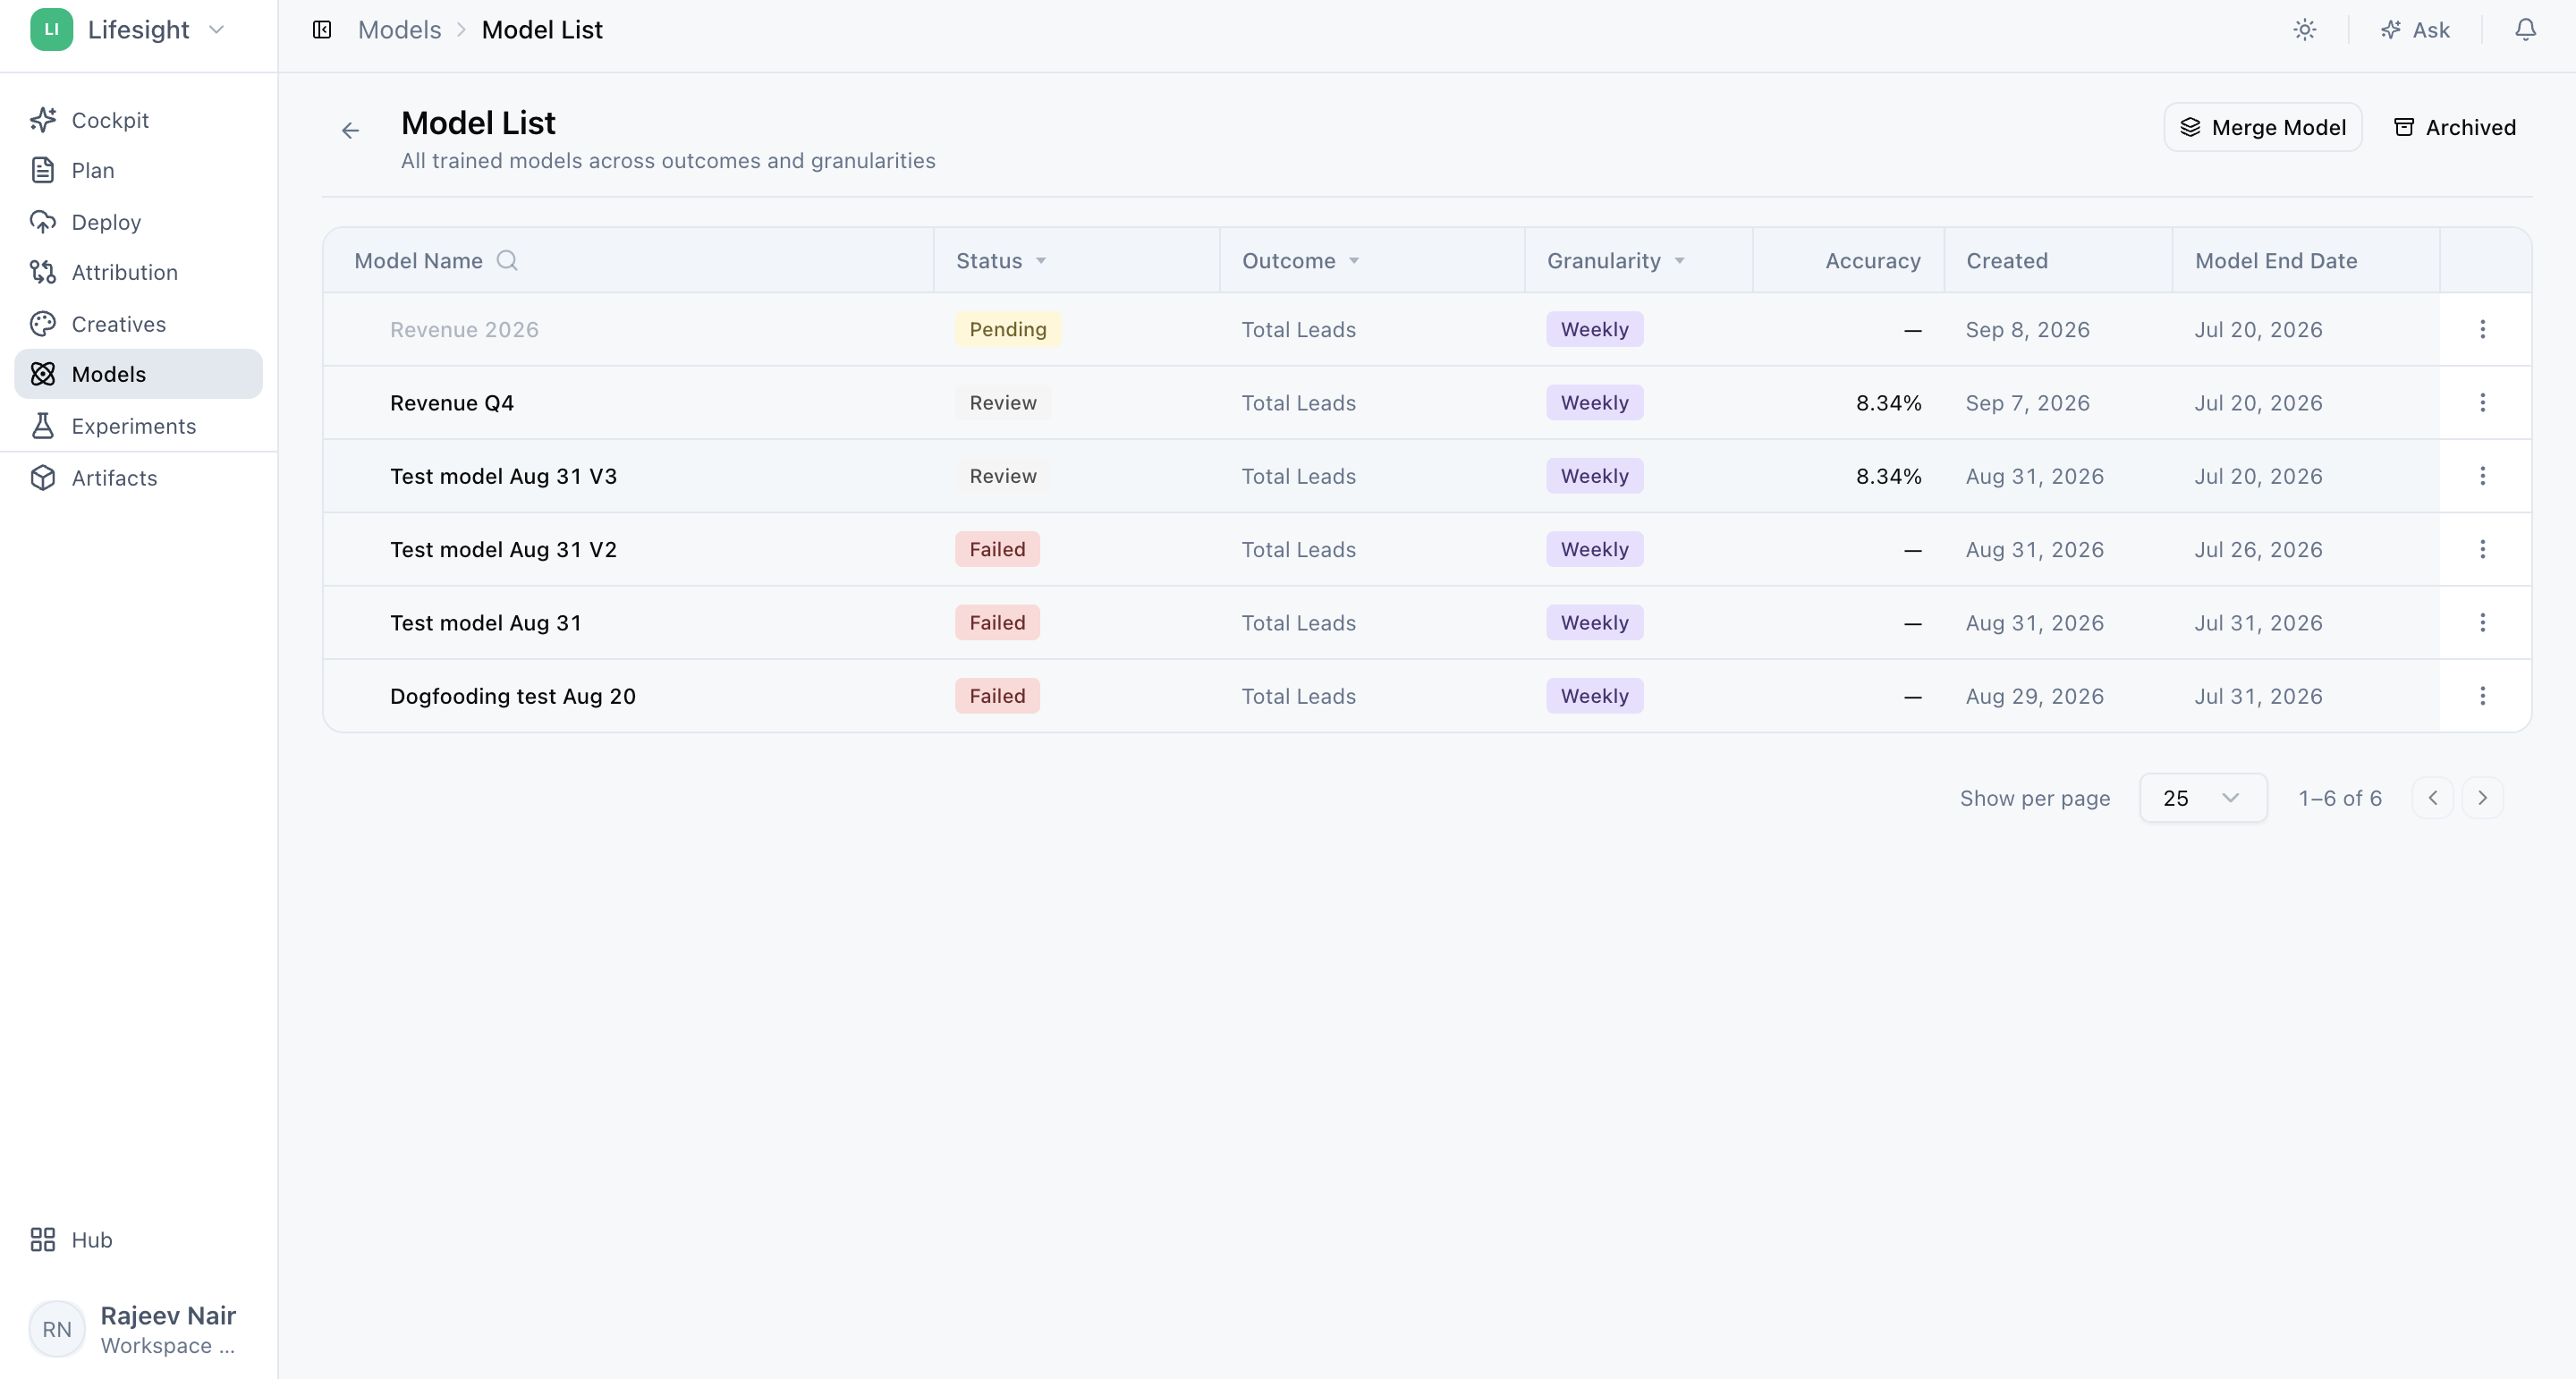
Once your model is created, open it to review its performance, contribution insights, response curves, and other results.
Frequently asked questions
How do I create a marketing mix model in Lifesight?
Select Models from the sidebar and click Create Model. Name your model, choose Marketing Mix Model as the Model Class, map your variables, configure your settings, add calibration if available, define causal relationships, then review and submit.
What data do I need to build a mix model?
You need historical data for your Outcome KPI, such as revenue or orders, along with spend for each paid media channel or tactic. You can also include organic activity, contextual factors, and halo variables to improve accuracy.
Should I use a Data Model or a CSV file?
Use a Data Model if your data is already connected and configured in Lifesight. Use a CSV file if your historical data is stored outside Lifesight. CSV files must follow the CSV Data Formatting Guidelines.
What is a Data Model?
A Data Model brings together fields configured from your connected sources and makes them available for variable mapping when you create a model.
What is an Outcome KPI?
The Outcome KPI is the primary metric you want the model to explain, such as revenue, orders, or new customers. It's the model's dependent variable.
What is the difference between paid, organic, contextual, and halo variables?
Paid variables are your paid media channels and tactics. Organic variables are non-paid activities, such as SEO or email. Contextual variables are outside factors, such as competitor promotions or pricing changes. Halo variables help explain how one activity influences other marketing, such as brand campaigns lifting search.
Can I map impressions and clicks for paid channels?
Yes. Spend is required for each paid channel or tactic, and you can also map impressions and clicks where available.
What does the treatment setting mean?
Treatment tells the model how you expect an organic, contextual, or halo variable to affect your Outcome KPI. Choose Positive if it should increase your KPI, Negative if it should decrease it, or Neutral if you want the model to decide.
Which aggregation should I choose?
Choose the aggregation that matches your input data: Daily, Weekly, or Monthly.
Why does the model ask for my country?
Selecting a country helps the model account for national holidays that may affect your results.
Should I keep the pre-configured variables turned on?
Yes, keep relevant factors such as Seasonality, Weekdays, Holidays, and Trend turned on. They help the model separate the effect of marketing from predictable patterns in your business.
What is training size?
Training size is the share of your data used to train the model. The remaining data is used for validation, which tests how accurately the model predicts results it hasn't seen.
What is adstock?
Adstock captures the carryover effect of advertising, where an ad keeps influencing results after it runs. Lifesight offers two methods: Geometric for simple decay and Flexible (Weibull PDF) for more complex patterns.
What is saturation?
Saturation models diminishing returns, where additional spend on a channel stops producing proportional increases in your KPI.
Should I change the advanced settings?
Keep the defaults unless you have a specific modeling reason to change them. Advanced settings are designed for data scientists and advanced users.
Can I reuse settings from a previous model?
Yes. Use Inherit from Model, where available, to start from a previous model's advanced settings. You can also inherit eligible calibration entries from an existing model.
What is calibration?
Calibration uses results from marketing experiments, such as lift studies or geo experiments, to anchor your model's estimates to observed incrementality. This can improve the accuracy of the model's results.
Is calibration required?
No. Calibration is optional. If you don't have suitable experiment results, continue to the next step.
What information do I need to add a calibration entry?
You need the channel or tactic tested, the experiment's start and end dates, the observed Incremental ROAS, and the confidence percentage for the result.
Can I add experiment results directly from Experiments?
Not yet. Enter experiment results manually or inherit eligible calibration entries from an existing model.
What is the difference between Potential and Forbidden relationships?
Mark a relationship as Potential when the Cause variable may influence the Effect variable. Mark it as Forbidden when the relationship shouldn't be considered, such as orders causing ad spend.
Why do causal relationships matter?
Causal relationships guide the model on which factors can influence each other and your outcome. This helps the model reflect how your marketing actually works, rather than picking up misleading correlations.
What should I check before submitting my model?
Confirm the model name, class, and owner, your variables, date range and aggregation, training size and refresh frequency, and any calibration entries.
How do I know when my model is ready?
After you submit, your model appears in the Models list with its processing status. You'll be notified when the run completes successfully.
What should I do after my model is built?
Open your model to review its performance, contribution insights, response curves, and other results before promoting it for use in Planner.
Related Articles
Updated about 3 hours ago