JavaScript SDK
Integrate our Lifesight Pixel to elevate your website's tracking.
The Lifesight JS SDK also referred to as 'Lifesight Pixel' lets you track customer event data from your website.
Once integrated, the pixel enables Lifesight to capture valuable behavioural data from your visitors, along with a variety of URL parameters such as UTM tags, search keywords, and more.
Tracking begins even before a customer is identified, and regardless of the devices they use. Our unique algorithm merges multiple touchpoints to create a first-party identity graph, providing you with a deep understanding of their entire journey.
What does Lifesight Pixel capture?
Lifesight Pixel tracks client-side events like a user visit or interaction with the website. These are some of the attributes that it auto-tracks:
- UTM Parameters: Tracks the source and journey of users as they land on your website.
- User Events: Records and monitors the specific actions users take on your site.
- Marketing Identifiers: Collects identifiers from platforms like Facebook, Google, and Snapchat, including first-party cookies and click IDs
Lifesight JS SDK APIs
The Lifesight Pixel provides a comprehensive API that lets you track and send your event data to any destination.
Identify
The identify API lets you identify a user and associate them to their actions. It also lets you record any traits about them like their name, email, etc. Once you make the identify call, the SDK persists the user information and passes it to the subsequent calls.
The identify method definition is as follows:
measureinsight.identify({traits})Traits(Dictionary Object): Contains the user’s traits or the properties associated with userId such as email, address, etc.
Note: customer_id is mandatory in identify call
{
"identifiers": {
"customer_id": "12314", //manadatory
"email": "[email protected]"
},
"customer_name": "Customer Name",
"customer_first_name": "Customer",
"customer_last_name": "Name",
"company": {
"name": "Customer Comapny"
},
"customer_created_at": "2024-03-13T10:25:19.713Z",
"customer_updated_at": "2024-03-13T10:23:19.713Z",
"email_marketing_consent": "false",
"customer_orders_count": "42",
"default_city": "Culiacan",
"customer_revenue": "420000",
"customer_last_order_name": "Customer Last Order",
"sms_marketing_consent_state": "false",
"customer_tags": "Highvaluecustomer",
"whatsapp_marketing_consent": "true",
"default_country_name": "Mexico",
"default_zip": "482001"
}When should I call Identify?
Ideally, you should call the identify method in the following scenarios:
- After a user registers on your website or app
- After a user logs in to your site or app
- when a user submits a form
- When a user updates their information, e.g., residential address, email ID
- When you load a page accessible by a logged-in user: Although this is optional, many tools (such as Intercom, for example) require an initial identify call to know who the user is when they first start the session.
Track Function
Track call allows you to record any actions your users perform, along with any properties that describe the action.
measureinsight.track(eventName, [properties]);| Parameter | Description |
|---|---|
| eventName | The name of the tracked event. eg) page view, add to cart etc |
| properties | The event-related properties. Note: If you do not want to send the properties, pass an empty object ({}) instead. |
Method 1: Implementing via Google Tag Manager [Recommended]
We assume that you have already created a GTM container for your website. If you don't have a container yet, create one according to the setup and installation guide. (click here)
-
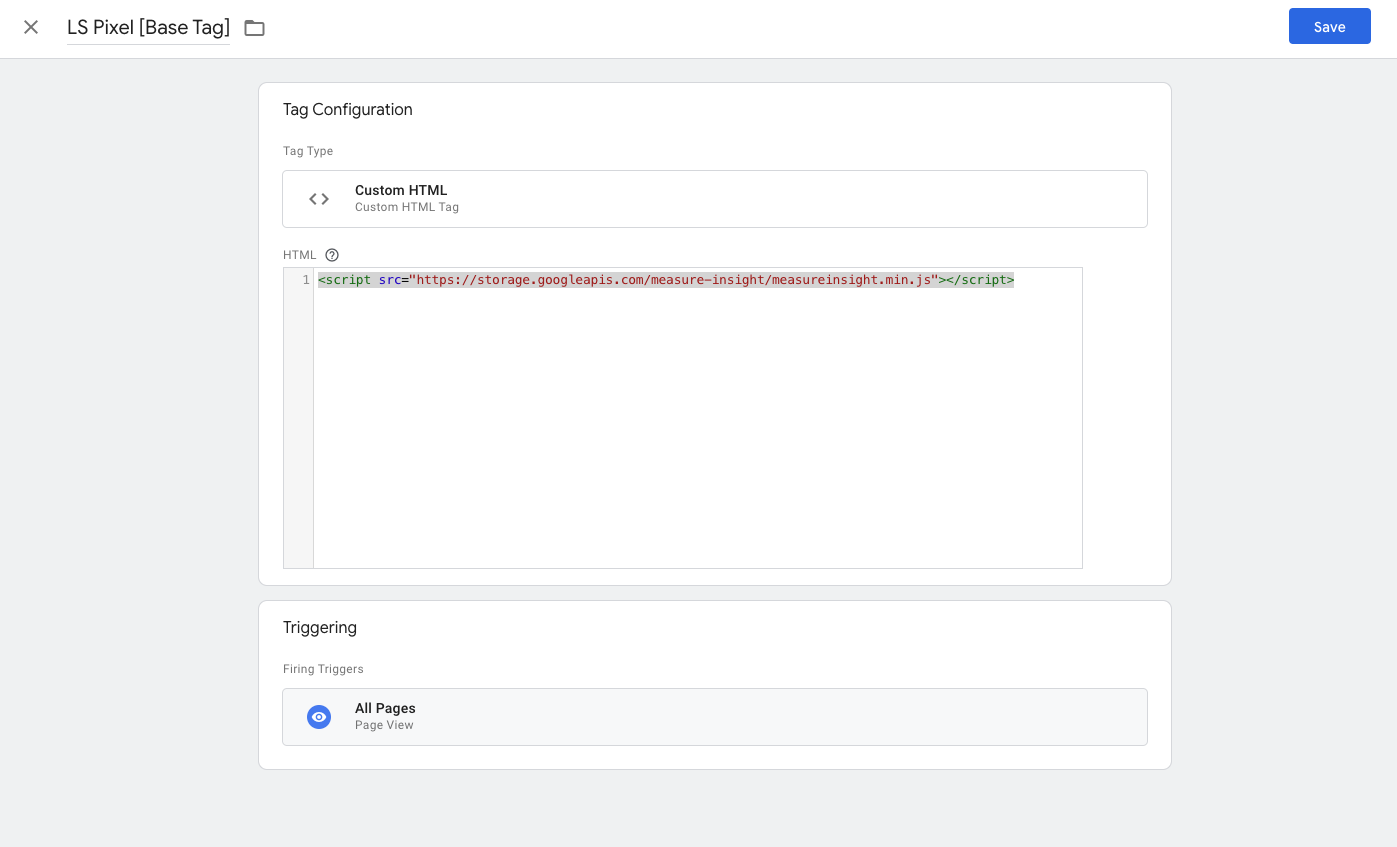
Step 1: Setting up the Custom JS SDK [Base Tag]
After Logging in to your Google Tag Manager Account and checking into the container your website is linked to:
- Create a new tag: When you are inside your container, click on the "Add a new tag" button in the container homepage or click on "New" in the "Tags" subpage.
- Choose "Custom HTML tag": Click on the "Custom HTML" tag.
- Configure the tag and click continue: Now copy-paste the Lifesight JavaScript code snippet.
<script src="https://storage.googleapis.com/measure-insight/measureinsight.min.js"></script> - Now for triggering: choose fire on All pages and click Create Tag: You can also choose to rename the tag.Created tags can be found in the Tags section of the container.
- Publish changes: After you have created a new tag you can see that the "Unpublished Changes" counter incremented by one. To publish new tags, click the "Publish" button in the top-right corner and then confirm by clicking "Publish now".
That's it! You have now added Lifesight Pixel to your website.You can now see whether the system events, such as page view, are flowing in by going back to your Lifesight Workspace and by looking at customer Profiles.
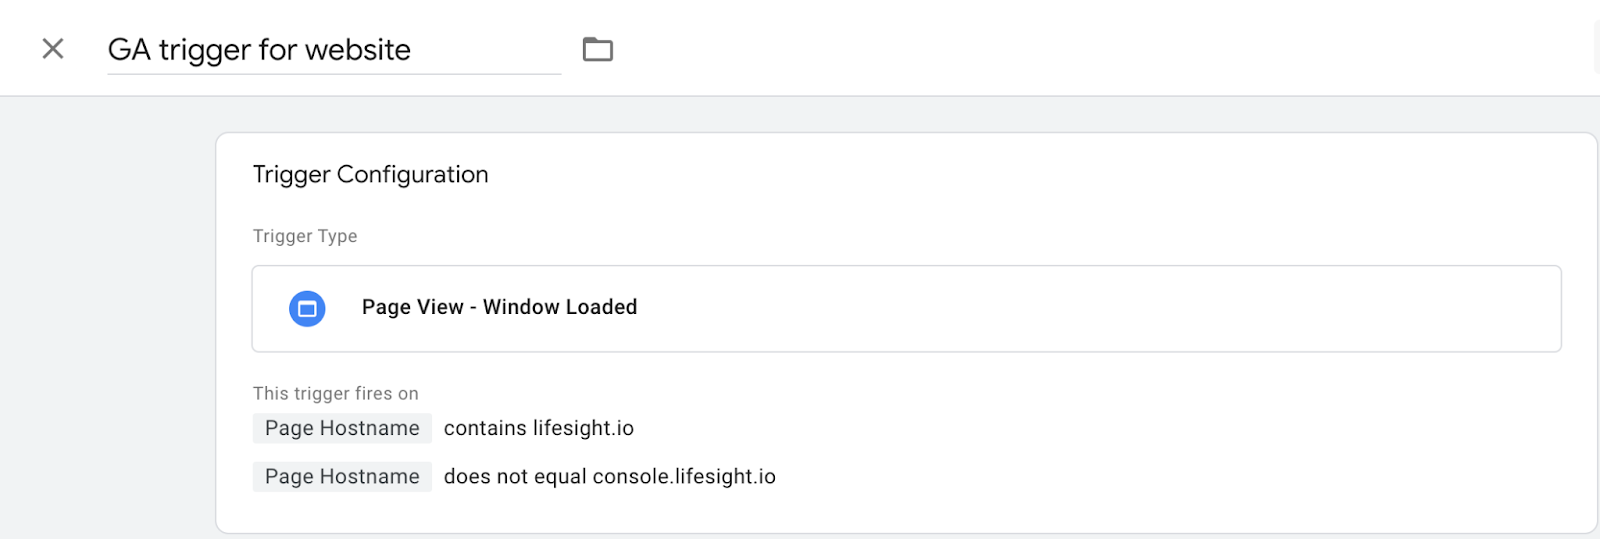
Note - This trigger (Page View - Window Loaded) is for Single Page Application (SPA) websites ( (ReactS / Next JS based Websites).
-
For every event that you wish to send to Lifesight (apart from page_view, which gets tracked by deafult), you need to create the required variables, triggers, and tags that need to be configured through our Identify and Track calls.2: Instrumenting additional API calls
Identify Function
Identify calls are fired when a user performs an identifying action like making a purchase or submitting a form. identify calls also associate a known user with their actions (even if previously anonymous).
When should you fire an Identify function?
- After a user registers on your website or app
- After a user logs in to your site or app
- When a user updates their information, e.g., residential address, email ID
- When you load a page accessible by a logged-in user (Although this is optional)
Note: You don't need to use the 'identify' function for anonymous visitors. Lifesight already assigns them an anonymous ID, so just 'page' and 'track' calls are enough.
Below are all the possible traits users can use (at least one identifier must be passed - customer_id, email, phone)
{
"identifiers":
{
"customer_id": "123",
"email": "[[email protected]](mailto:[email protected])",
"phone": "1234567899"
}
"customer_name": "",
"customer_first_name": "",
"customer_last_name": "",
"address":
{
"city": "Bengaluru",
"country": "India",
"postalCode": "560067",
"state": "Karnataka",
"street": "High Street"
},
"age": "23",
"birthday": "2002-11-22", //format is fixed to be yyyy-mm-dd
"company":
{
"name": "Lifesight",
"id": "1234",
"industry": "Ad-Tech",
"employee_count": "200",
"plan": "Platinum"
},
"description": "Tall",
"gender": "Male",
"title": "Product Intern",
"username": "RishiZen",
"website": "[www.rishi.com"](http://www.rishi.com"),
"Avatar": "[www.pathToImage.com"](http://www.pathToImage.com")
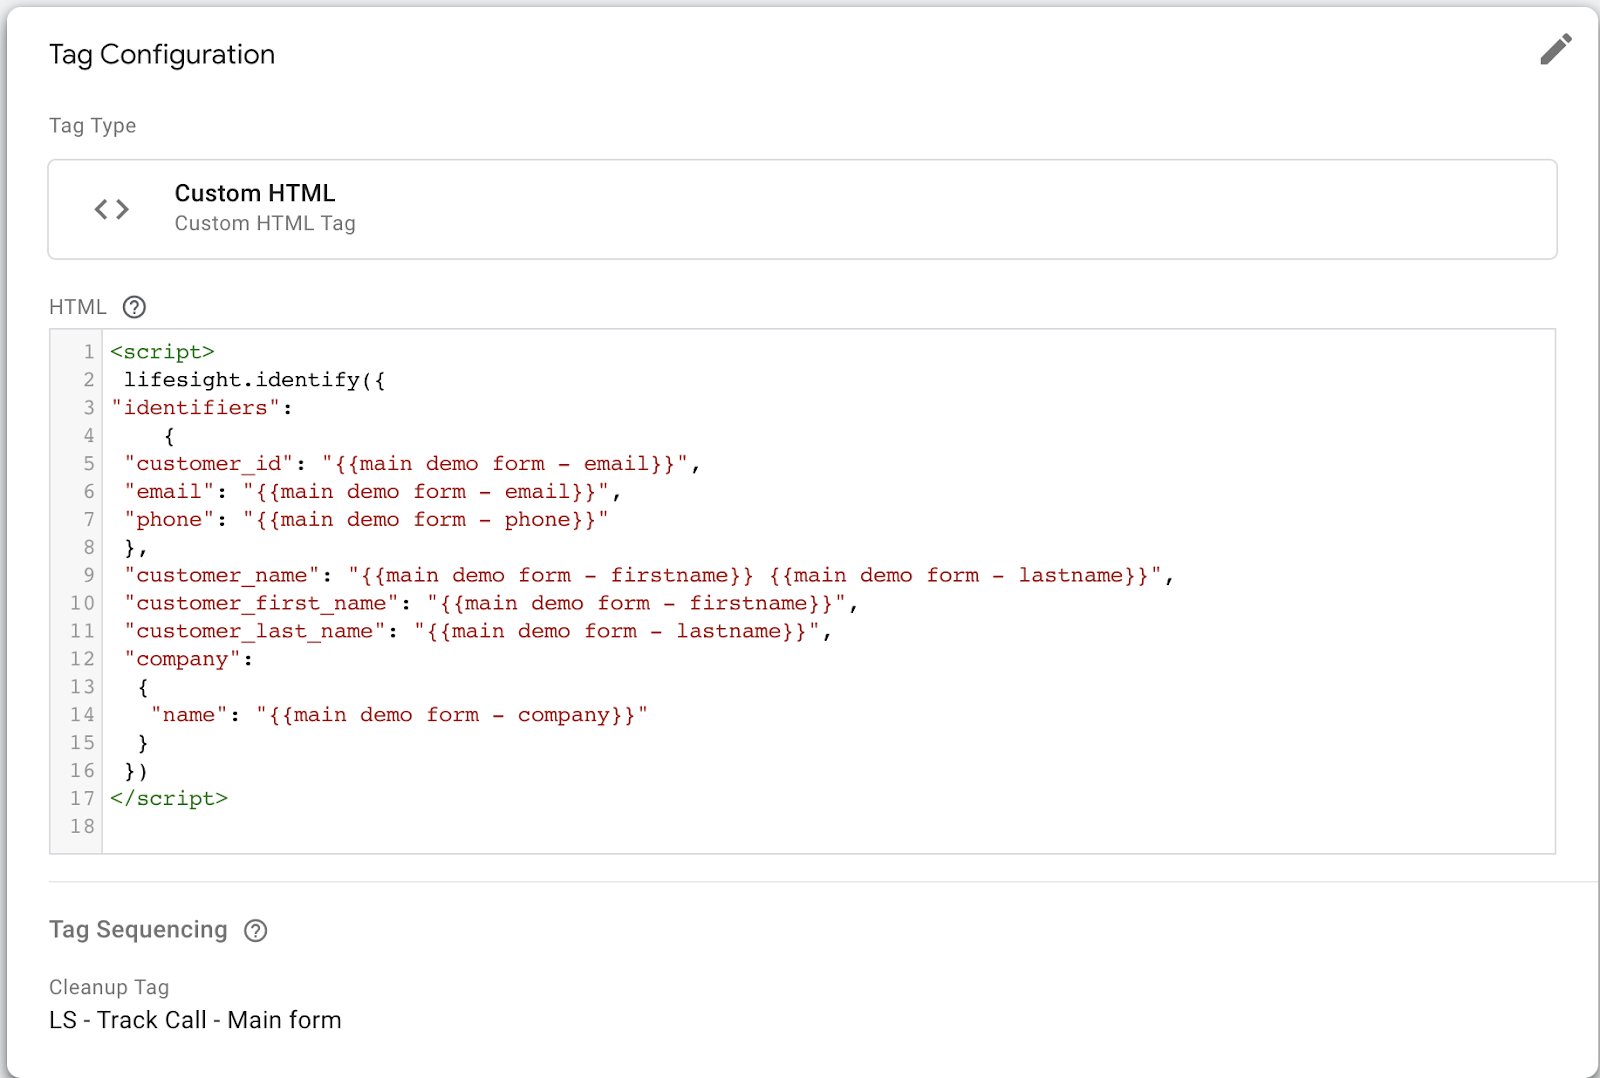
}Example of how this Identify call is configured on Google Tag Manager
Track Function
The track call lets you record the user actions along with any properties associated with them. Each user action is called an event. Every event has a name associated with it, for example, Product Reviewed. This event might also have some properties associated with it, like review_id and rating.
Example of track call for event product_view payload
lifesight.track
( "product_view",
{
"product":
{
"lineitem_price": 4.99,
"product_id": 6814932369498,
"product_image_url": "//cdn.shopify.com/s/files/1/0572/8498/4922/products/Product8.png?v=1667508518",
"product_name": "Pupman Bootique Halloween Printed Dog Collar",
"product_url": "/products/bootique-hw-collar",
"sku": "ABC123"
}
}
)
Example of Track call for event form_submit Payload
lifesight.track ("form_submit",
{
"campaign_name": "List_test", // there can be multiple forms under this campagin name
"form_name": "List_test", // Sign Up Newsletter form
"cta": "register", //Call to Action
"identifiers":
{
"anonymous_id": "4c01a409-b70a-49a3-aa40-ac5975ec8087",
"email": "[[email protected]](mailto:[email protected])"
},
"input":
{
"email": "[[email protected]](mailto:[email protected])",
"phone": "+91xxxxxxxxxx",
"birthday": "1999-10-18", //format is fixed to be yyyy-mm-dd
"last_name": "sai",
"first_name": "rohit",
"address":
{
"city": "Bengaluru",
"country": "India",
"postal_code": "560067",
"state": "Karnataka",
"street": "High Street"
},
"age": "23",
"company":
{
"name": "Lifesight",
"id": "1234",
"industry": "Ad-Tech",
"employee_count": "200",
"plan": "Platinum"
},
"description": "Tall",
"gender": "Male",
"title": "Product Intern",
"website": "[www.rishi.com"](http://www.rishi.com"),
"website_platform":"shopify",
"Product_interested":"connect",
"contacts_count":"",
"monthy_ad_spent": "",
"additional_information":""
}
}
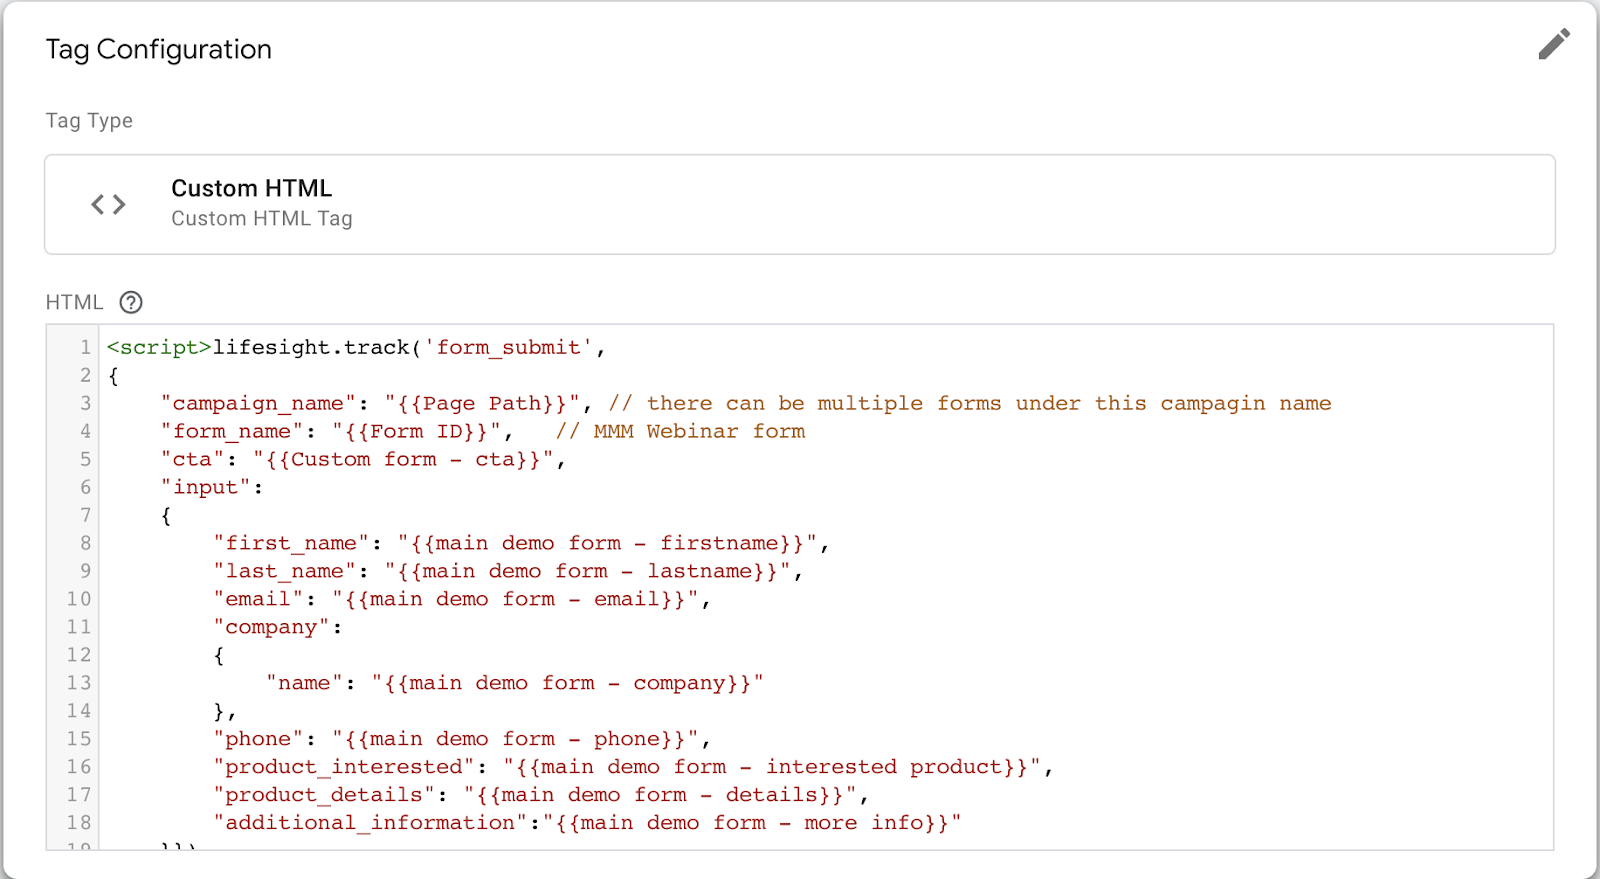
)Example Track call is configured on Google Tag Manager
Examples of standard e-commerce client-side events that you can set up on your tag manager
| Event Name | Name | Name | Description |
|---|---|---|---|
| product_view | Viewed Product | Product Viewed | When a Product is viewed. |
| product_search | Search | Search | When a search is performed. |
| add_to_cart | Added to Cart | Added to Cart | When an item is added to the shopping cart. |
| product_list_view | Viewed Product List | Product List Viewed | When list of products on page, cart or order is viewed. |
| checkouts_create | Created Checkout | Checkout Created | When the checkout process is started. |
| checkouts_update | Updated Checkout | Checkout Updated | When the checked list is updated with new set of items. |
| abandoned_checkout | Abandoned Checkout | Checkout Abandoned | When payment information is added in the checkout flow. |
| orders_paid | Paid for Order | Payment Completed | When a payment is completed. |
| orders_create | Placed Order | Order Placed | When an order is placed. |
| form_submit | Submitted Form | Form Submitted | When a form is submitted for newsletter subscription or zero party survey data form fill. |
| thank_you_page_view | Viewed Thank You Page | Thank You Page Viewed | The Thank you Page viewed by the user right when the order is completed after the payment is done. |
While configuring the events, make sure you use the same event naming convention mentioned in the above table. Some examples are given below in detail. The way to call the tag in the Google Tag manager is lifesight.track ( "add_to_cart", {identifiers…})
Method 2: Implementing Lifesight SDK Manual
To integrate your website with Lifesight using our JavaScript SDK, you need to copy-paste the integration snippet into the header of your webpage
Updated 11 months ago